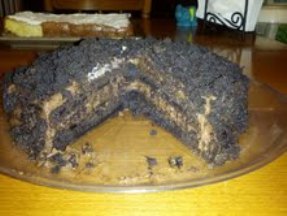
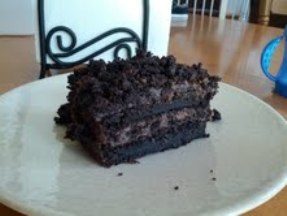
As I mentioned in my previous post, this past weekend was my husband’s birthday, and I went a little crazy and decided to make him two cakes to celebrate the occasion. The first was a yummy tres leches cake, and the second was this insanely, intensely delicious chocolate blackout cake.
To give you the back story (it’s a quick one): Before my husband and I had our baby, we used to actually leave the house for dinner every so often. And when we did, we’d often hit up a local diner that served this awesome chocolate cake. My husband, who’s definitely not a big cake person, would order it and devour it every time. So since it was his birthday, and since it’s been well over a year since we’ve gone out and had that cake, I decided I would try to make something similar.
I started searching for a blackout cake recipe online and stumbled across this classic Brooklyn recipe from the famed and long-gone Ebinger’s bakery. Being a Brooklyn girl at heart (I grew up there), I just had to give it a go. And it’s a good thing I did, because I think this is one of the best cakes I’ve ever made. The cake itself is rich and moist, and combined with the chocolate pudding filling, the end result is absolutely amazing. If you’re a chocolate-lover, you must try this cake. And when you do, having a tall glass of milk on hand and is practically a must.
The recipe itself isn’t complicated, but you do need to leave yourself enough time to allow the pudding to set up. I actually made the pudding the day before and left it in the fridge overnight; but if you start early enough, you can definitely pull off this cake in a single day. And if you’re like me and my husband, you can definitely take down half this cake in a single sitting. But you probably shouldn’t. No judgment either way.
Chocolate Blackout Cake
Original recipe can be found here
Ingredients:
For the cake:
1 stick unsalted butter, plus extra for greasing pans
1 and 1/2 cups AP flour, plus extra for dusting pans
2 tsp baking powder
1/2 tsp baking soda
1/2 tsp salt
3/4 cup cocoa powder
1 cup strong black coffee
1 cup buttermilk
1 cup packed light brown sugar
1 cup granulated sugar
2 large eggs
1 tsp vanilla extract
For the chocolate pudding/filling:
1 and 1/4 cups granulated sugar
1/4 cup cornstarch
1/2 teaspoon salt
2 cups half and half
1 cup whole milk
6 oz unsweetened chocolate, chopped
2 tsp vanilla
Method:
For the cake:
1. Preheat your heat oven to 325 degrees.
2. Butter and flour two 8-inch cake pans, plus a mini loaf tin (you’ll want to have an extra “mini cake” on hand for the crumb topping).
3. Whisk together the flour, baking powder, baking soda, and salt. Set aside.
4. Melt the butter in a large saucepan over medium heat. Stir in the cocoa and cook until fragrant, about 1 minute.
5. Take the mixture off the heat and whisk in your coffee, buttermilk, and sugars until dissolved.
6. Whisk in your eggs and vanilla, and then slowly whisk in the flour mixture.
7. Pour some batter into the mini loaf pan until it’s about half-full. Then divide the remaining batter evenly between your 8-inch pans and bake for 30-35 minutes, or until an inserted toothpick comes out clean.
8. Let the cakes cool in their pans for about 15 minutes and then invert onto a wire rack to cool completely (at least one hour).
For the chocolate pudding/filling:
1. Whisk together your sugar, cornstarch, salt, half and half, and milk in a large saucepan.
2. Set the pan over medium heat. Add the chocolate and whisk constantly until the chocolate melts and the mixture begins to bubble. (The original recipe said this would take 2 to 4 minutes, but I let mine go for about double that time. You want the mixture bubbling pretty consistently; otherwise your pudding may not set up.)
3. Stir in your vanilla and transfer the pudding to large bowl.
4. Place plastic wrap directly on the surface of the pudding and refrigerate until cold, at least 4 hours and up to a full day. The plastic wrap is supposed to prevent a skin from forming. If you get one anyway, just scrape it off.
To assemble the cake:
1. Take the cake from the mini loaf pan and use your hands to crumble it into crumbs. Set aside.
2. Place the first cake layer on a platter and top with pudding. Sprinkle on crumbs.
3. Place the second cake layer on top of the filling and spread your remaining pudding evenly over the top and sides of the cake. Then sprinkle your remaining cake crumbs evenly over the top and sides of the cake, pressing lightly so that the crumbs stick.
4. Store the cake in the refrigerator. The recipe says it’ll keep for two days, but that depends on the speed at which you devour it. Again, no judgment either way.


