Blueberry and Peach Crumble

Now that the warm weather seems to be sticking around, I’ve been less and less in the mood for brownies (I know, blasphemy) and more and more in the mood for all things fruit-related. I just love the selection of fresh fruit we get this time of year, and I find myself constantly stocking up and chowing down on melons, peaches, plums, and berries. And while I can easily enjoy my fruit as-is, for me, there’s almost nothing better than a warm, fresh-from-the-oven fruit crumble.

The great thing about crumbles like this one is that they’re super easy to make. Just slice up your favorite fruit and toss it in a little sugar and lemon juice. Then whip up a crumble mixture using your hands, toss it in the oven, and you’re done.

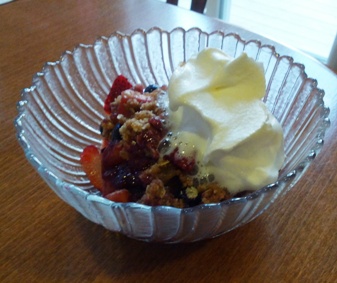
For my latest concoction, I decided to feature blueberries and peaches in the crumble itself, but what I actually did was cut up a bunch of strawberries and plums to use as a cold, fresh bottom layer. You don’t have to take that extra step, but I like the contrast of cold fruit on the bottom, warm crumble in the middle, and cool whipped cream on top. Vanilla ice cream also works wonderfully if you have some on hand. Or, you can forego the extras and enjoy this crumble on its own.

Here’s to a summer full of fresh fruit and delicious fruit-centric recipes.

blupeachcrumble

Blueberry and Peach Crumble

Ingredients:

For the fruit mixture:
1 cups blueberries
1 cup peaches, peeled and sliced (about 2 large or 3 medium peaches)
1 tablespoon lemon juice
1/2 cup granulated sugar
1 and 1/2 tablespoons AP flour

For the topping:
1/4 cup AP flour
1/4 cup oats (instant should work just fine)
1/4 cup dark brown sugar
2 tablespoons granulated sugar
1/2 teaspoon cinnamon, or 1/4 teaspoon cinnamon and 1/4 teaspoon nutmeg – whichever flavor profile you prefer
Pinch of salt to taste
1 teaspoon ground cinnamon
3 tablespoons room temperature butter cut into small pieces

Method:
1. Preheat your oven to 350 degrees.
2. To make the fruit mixture, combine the blueberries and peaches in a medium-sized oven-safe bowl (Pyrex works well). Toss with lemon juice, sugar, and flour until the fruit is well-coated. Let the mixture sit for about 20-30 minutes before topping.
3. To make the topping, whisk together the flour, oats, sugars, salt, and cinnamon in a medium bowl. Using your fingers, mix in the pieces of butter until the mixture comes together and takes on a crumbly consistency. To make this step easier, before you get started handling the butter, try coating your fingers with a little cooking spray. You’ll have less trouble working with the mixture once it gets sticky. Once the crumble comes together, sprinkle it evenly over the fruit.
4. Place the bowl with the now-assembled fruit crisp on a larger baking sheet. Bake for 35-45 minutes, or until the top starts to brown and you can see the fruit mixture bubbling on the sides. Serve warm with whatever accompaniments you prefer.
5. Store leftovers, if any, in the fridge, and eat within a day or two. This recipe is designed to serve four people, but you can easily double or triple it if you’re looking to feed a larger crowd.

Chocolate Butterscotch Crumb Bars

I like my job. I really do. But what I don’t like about my job is the fact that people tend to wait till the very last possible minute to ask me for things.

Now normally I pride myself on having a pretty good work ethic and going out of my way to be helpful. And I’m definitely not the type of person to put things off till the following day if there’s any chance of getting the job done on the spot. But when you email me at the very last second asking for something that will take at least 30 minutes of my time, you’re putting me in a position where I might be late picking up my child from daycare. And being late to daycare is bad for a lot of reasons, not the least of which is the fact that you actually get charged by the minute for not showing up on time.

A few weeks ago, I almost didn’t make it to the center on time. In fact, the only reason I got there about a minute shy of closing is that I was more than a little bit liberal with some of our local traffic laws. And why was I rushing in the first place? Oh yeah, because someone needed something from me at the very last possible minute, kind of like what happened last night.

Okay, rant over. I’m sure I’m not the only working person who goes through this, right?

Anyway, moving on…let’s talk about these yummy chocolate crumb bars. I decided to bake something for my coworkers—not the ones who cause me stress and aggravation by demanding things at the last minute, but rather the ones I actually like. These bars are really tasty and relatively simple to whip up. The original recipe didn’t include butterscotch chips, but I’m a big fan of the chocolate-butterscotch flavor combo and decided to mix things up a bit. I like the fact that these bars get nice and gooey in the center. They’re a great snack to have on hand or share with people you like. You can also keep some in your car in case you get pulled over by a local police officer wanting to know why you were going 50 in a 30 mile per hour zone and you need some sort of impromptu bribe. (For the record, I didn’t actually get pulled over en route to daycare. But it could’ve happened. Multiple times over. Thank you, procrastinating coworkers. Okay, maybe my rant wasn’t quite over.)

crumbbars

Chocolate Butterscotch Crumb Bars
Original recipe can be found here

Ingredients:
1 cup (2 sticks) of butter, softened
1 and 3/4 cups AP flour
1/2 cup granulated sugar
1/4 teaspoon salt
1 cup of semisweet chocolate chips, divided
1 cup of butterscotch chips, divided
1 can (14 oz) of sweetened condensed milk
1 teaspoon vanilla extract

Method:
1. Preheat your oven to 350 degrees. Grease a 13 x 9-inch baking pan.
2. Beat the butter in a large mixing bowl or in a stand mixer until creamy. Mix in the flour, sugar, and salt until crumbly.
3. With or floured or greased fingers (I sometimes spray a bit of cooking spray onto my fingers), press 2 cups of the crumb mixture into the bottom of your prepared baking pan; reserve remaining mixture for topping.
4. Bake for 10-12 minutes, or until the edges are golden brown.
5. While the mixture is baking, combine 1/2 cup semisweet chips, 1/2 cup butterscotch chips, and condensed milk in a small saucepan.
6. Warm over low heat, stirring until smooth. Stir in vanilla extract. Spread over hot crust.
7. Stir remaining chips into reserved crumb mixture and use your hands to sprinkle over chocolate filling.
8. Bake for 25-30 minutes, or until center is set.
9. Cool in pan on wire rack before cutting into bars.

White Chocolate Coconut Butterscotch Bark

Ever meet one of those people who claims he or she doesn’t like sweets? That’s exactly the type of story a friend of mine tried to stick to recently when I offered her a piece of my latest concoction.

“No thanks,” she had answered. “You know me; I don’t really go for sweets.”

My response? “Um, okay, more for me then.”

And so I proceeded to help myself to a piece (or three) of candy as we sat in my living room chatting, and at some point during the conversation, she suddenly had a change of heart and decided she wanted a taste. I of course obliged, and 10 minutes later, I found myself prying the plate of confections out of her hands for fear that Miss I Don’t Like Sweets would singlehandedly devour my entire supply in a single sitting (or at least that’s the scenario that played out in my head…in reality, all I could do was sit there and watch in horror as she took down piece after piece).

Anyway, the fact that my adamantly anti-sweets visitor couldn’t stop herself from eating this candy is a testament to how good it is. And the best part about this concoction is that it’s so incredibly easy to make. Just toast some coconut, mix in some melted chocolate, and wait (not so) patiently as it sets in the fridge. Then bust it out and get ready to convert even the biggest non-believers in all things sugary sweet.

cocobark

White Chocolate Coconut Butterscotch Bark

Ingredients:
2 cups sweetened coconut, toasted and divided into 4 equal parts
1 and ½ cups white chocolate
1 cup butterscotch chips

Method:
1. Line a baking sheet with parchment paper; set aside.
2. Toast coconut in the oven or microwave; set aside.
3. Heat the white chocolate in the microwave at 50% power for 30-second intervals, stirring in between. Once melted, stir ¼ of the toasted coconut into the chocolate. Pour the mixture onto the prepared baking sheet and use an offset spatula to spread it around. Top with ¼ of the coconut.
4. Heat the butterscotch chips in the microwave using the method described above. Once melted, stir in ¼ of the coconut. Pour over the white chocolate and coconut layers and use a spoon to swirl it around. Top with remaining coconut and let set in the fridge for 1-2 hours. Once set, use a sharp knife or your hands to break into pieces.
5. Be careful when offering to friends—your supply may start to dwindle too rapidly for comfort.

Strawberry Shortcake Crumble

I’m definitely known as the resident baker among my family members, friends, and coworkers. But when the weather heats up, baking tends to take a backseat to frozen treats and ice cream-related indulgences. And since it’s been super hot and humid these past bunch of days, I haven’t exactly been in the mood to spend more time than necessary near a warm oven. But this past Sunday I made an exception on the occasion of my mother’s birthday.

My mom is awesome. She’s everything you could ever ask for in a mother, and as busy as I am, she always seems to be busier—yet somehow she manages to do her job, cook, maintain a household, and take care of her often-needy adult children. (Yep, I’ll admit it. Even in my 30s, I still need my mother on a regular basis). So when I found out she’d be coming over to hang out with her grandson (’cause there’s really no better way to celebrate your birthday than to chase a 17-month-old around), I decided I had to whip up her favorite dessert: strawberry shortcake.

In the past, I’ve attempted grand versions of this dessert that have included multiple layers of cake, a rich strawberry filling, and lots and lots of whipped cream. But considering that the last strawberry shortcake I made could’ve fed a small army, I thought I’d try something simpler since we were a pretty small crowd. And let me tell you, I’m so glad I did, because this version of strawberry shortcake just might be my favorite yet.

You start with a buttery base, layer on some strawberry goodness, and throw a crumbly layer on top to finish it off. In fact, you could say this is more of a strawberry crumble than a strawberry shortcake, and you wouldn’t be wrong. I’m certainly not one to argue over semantics when we’re talking about something this good.

The original recipe suggests serving this warm, which I did. To make it a bit more decadent and complete, I topped my fresh-from-the-oven cake with some homemade whipped cream and vanilla ice cream. My mom absolutely loved it, as did everybody else at the table. In fact, we basically devoured close to the entire cake in a single sitting. Don’t judge us.

strawshortcake

Strawberry Shortcake Crumble
Recipe from Serious Eats

Ingredients:
For the strawberry filling:
1 quart fresh strawberries, washed, hulled, and sliced
2 tablespoons lemon juice
2 tablespoons granulated sugar

For the cake:
2 cups AP flour
4 teaspoons baking powder
3/4 teaspoon salt
1/4 teaspoon nutmeg (I omitted this because my mom doesn’t like nutmeg, and we didn’t miss it)
6 tablespoons granulated sugar
5 1/3 tablespoons unsalted butter
1 large egg
2/3 cup buttermilk
2 teaspoon vanilla

For the topping:
4 tablespoons unsalted butter
2 tablespoons brown sugar (the original recipe calls for light, and I used dark; either should work)
2 tablespoons granulated sugar
6 tablespoons all purpose flour

Method:
1. Preheat your oven to 400 degrees and lightly grease an 8×12 baking pan (or 9×13 if you don’t have the 8×12 size). Pour sliced strawberries into a medium bowl. Sprinkle with lemon juice and toss with sugar. Set aside.
2. In a medium bowl, whisk together the flour, baking powder, salt, and nutmeg. Set aside.
3. In a large mixing bowl or using the bowl of a stand mixer, cream together the sugar and butter. Beat in the egg. Add flour mixture alternately with buttermilk. Stir in vanilla until just incorporated.
4. Spread out the dough in the bottom of your baking pan.
5. Pour the strawberries and juice on top of the dough.
6. Cream together the butter, sugars and flour for the topping and sprinkle over the strawberries.
7. Bake for 35-40 minutes, or until the top turns golden brown and an inserted toothpick comes out clean.
8. Serve warm, ideally with whipped cream and/or ice cream – though the cake is also fabulous on its own.