Cookie Dough Truffles

Yesterday was just one of those days. You know, those days.

I won’t bore you all with the details, but let’s just say that every minor thing that could’ve gone wrong went wrong. In other words, nothing particularly terrible—just enough tiny doses of annoyance whose sum total rendered me frustrated and aggravated by the time I was able to finally put the baby to bed and call it a day.

Okay, vent over. See, that wasn’t so bad. And now I can talk about the cookie dough truffles I made myself to compensate for the above-referenced aggravation.

These truffles are tasty and super easy to whip up. But, you need some time to allow them to set, so if you’re craving something sweet in an instant, you’ll probably want to opt for something that doesn’t require you to wait three hours (though you could, ahem, always eat some of the cookie dough along the way…as long as nobody’s watching, your secret is safe).

cdough

Cookie Dough Truffles
Recipe from Sweet Pea’s Kitchen

Ingredients:

For the cookie dough:
1 and 1/2 sticks of butter
3/4 cup light brown sugar
3/4 cup granulated sugar
3 tablespoons milk (I used whole)
1 1/2 teaspoons vanilla
1 1/2 cups AP flour
1 1/2 cups mini semisweet chocolate chips

For the dipping chocolate:
6 ounces semisweet chocolate
2 tablespoons shortening

Method:

1. Line a baking sheet with waxed paper and set aside.
2. Beat the butter, brown sugar, and white sugar until light and fluffy, about 3 minutes. Beat in milk and vanilla until combined, about 1 minute. Mix in flour just until combined. Stir in chocolate chips.
3. Shape the cookie dough into balls, using about 2 teaspoons of dough for each ball. (I started out doing this with a spoon and after a couple of tries found that it was easier to just use my hands.)
4. Place the cookie dough balls on your lined baking sheet and refrigerate for at least an hour (I left mine in for about 90 minutes, and that did the trick).
5. Once the cookie dough balls have hardened up, melt the shortening and chocolate. I did this in the microwave on 50% power for 30-second intervals, stirring in between each.
6. Dip the cookie dough balls in the melted chocolate and return them to the baking sheet (or, do what I did and prepare a second waxed paper-lined baking sheet).
7. Let the coated cookie dough balls set in the fridge for 1-2 hours before serving.


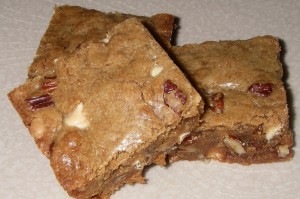
White Chocolate Toffee Toasted Pecan Blondies

I’ve talked about my sweet tooth many times before, but let’s discuss my obsession with sweet things one more time for the purpose of sharing my latest sugar-infused creation. This concoction is actually based on the white chocolate cranberry blondies I made over the summer. But whereas the dried cranberries in that recipe cut the sweetness factor a little, the toffee and toasted pecans in this one serve the opposite purpose. In other words, you’ve been warned: These blondies are sweet. Very sweet. But if you’re like me, that’s not such a bad thing.

toastedpecanblond

White Chocolate Toffee Toasted Pecan Blondies

Ingredients:

3/4 cup butter, melted and cooled to room temp
1 and 1/2 cups packed dark brown sugar
2 large eggs
3/4 teaspoon vanilla extract
2 and 1/4 cups AP flour
1 and 1/2 teaspoons baking powder
1/4 teaspoon salt
1/4 teaspoon ground cinnamon
3/4 cup white chocolate chips
3/4 cup toffee bits
3/4 cup chopped toasted pecans

Method:

1. Preheat your oven to 350 degrees. Spray a 13×9-inch baking pan with nonstick spray and set aside.
2. In a large bowl, whisk together the butter and brown sugar until well-combined.
3. Beat or whisk in the eggs and vanilla.
4. In a separate bowl, whisk together the flour, baking powder, salt, and cinnamon.
5. Gradually add the dry mixture to the butter mixture.
6. Stir in the white chocolate chips, toffee bits, and pecans. The batter will be thick.
7. Spread your batter into the prepared pan and bake for 27-32 minutes, or until an inserted toothpick comes out clean.
8. Let the blondies cool in their pan completely before cutting and serving.

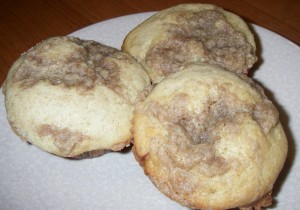
Allspice Crumb Muffins

I know I’ve already gone on and on about how much I absolutely love the flavors of fall, so bear with me as I say it once again, this time in the form of praise for these allspice muffins. If you’re a fan of cinnamon, sugar, and warm, buttery crumb-topped muffins, go ahead and make yourself a batch of these.

allspicemuff

Allspice Crumbs Muffins
Recipe from Eva Bakes

Ingredients:

For the crumb topping:

½ cup AP flour
½ cup light brown sugar
½ tsp ground allspice
5 tbsp cold unsalted butter, cut into bits

For the muffins:

2 cups AP flour
½ cup granulated sugar
1 tbsp baking powder
½ tsp ground allspice
¼ tsp salt
¼ cup light brown sugar
1 stick unsalted butter, melted and cooled
2 large eggs
¾ cup whole milk
¼ tsp vanilla

Method:

For the crumb topping:

  1. Mix the flour, brown sugar, and allspice in a small bowl. Add the chunks of cold butter and mix with your hands by pinching the mixture between your fingers until you have uneven, pea-sized crumbs. (Tip: To avoid having the mixture stick to your hands, try coating your fingers with a bit of cooking spray.)
  2. Place the topping in the refrigerator until ready to use (it can be made up to 3 days ahead and stored, covered, in the fridge).

For the muffins:

  1. Preheat your oven to 375 degrees and line a muffin pan with 12 muffin cups.
  2. In a large bowl, whisk together the flour, granulated sugar, allspice, baking powder, and salt. Add in the brown sugar and stir until no lumps remain.
  3. In a separate large bowl, mix together the melted butter, eggs, milk, and vanilla until well-combined. Pour the liquid ingredients into the dry ingredients, whisking gently but quickly to combine. The batter may be lumpy, and that’s okay.
  4. Evenly distribute the batter into the muffin cups. Sprinkle the crumb topping over each muffin, and then use your fingertips to gently press the crumbs into the batter.
  5. Bake for about 20 minutes, or until the tops are golden and an inserted toothpick comes out clean.
  6. Let the muffins cool in their pan for about five minutes before transferring them to a wire rack to cool completely.

Although these muffins can supposedly last up to five days when stored in an airtight container at room temp, I found that they started to dry out after two or three days. My advice is to cut the recipe in half if you don’t think you’ll finish yours within a couple of days. Yes, it may seem like a lot of work for such a small amount of muffins, but trust me, these are well worth it.