Chocolate Blackout Cake

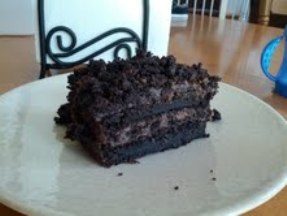
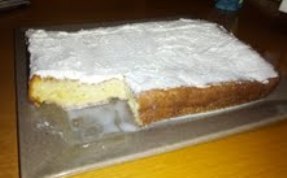
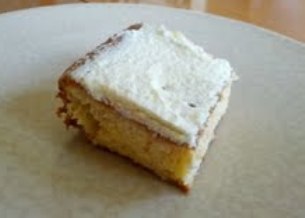
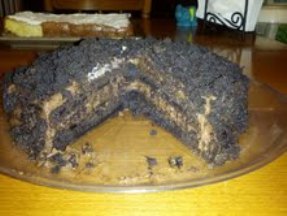
As I mentioned in my previous post, this past weekend was my husband’s birthday, and I went a little crazy and decided to make him two cakes to celebrate the occasion. The first was a yummy tres leches cake, and the second was this insanely, intensely delicious chocolate blackout cake.

To give you the back story (it’s a quick one): Before my husband and I had our baby, we used to actually leave the house for dinner every so often. And when we did, we’d often hit up a local diner that served this awesome chocolate cake. My husband, who’s definitely not a big cake person, would order it and devour it every time. So since it was his birthday, and since it’s been well over a year since we’ve gone out and had that cake, I decided I would try to make something similar.

I started searching for a blackout cake recipe online and stumbled across this classic Brooklyn recipe from the famed and long-gone Ebinger’s bakery. Being a Brooklyn girl at heart (I grew up there), I just had to give it a go. And it’s a good thing I did, because I think this is one of the best cakes I’ve ever made. The cake itself is rich and moist, and combined with the chocolate pudding filling, the end result is absolutely amazing. If you’re a chocolate-lover, you must try this cake. And when you do, having a tall glass of milk on hand and is practically a must.

The recipe itself isn’t complicated, but you do need to leave yourself enough time to allow the pudding to set up. I actually made the pudding the day before and left it in the fridge overnight; but if you start early enough, you can definitely pull off this cake in a single day. And if you’re like me and my husband, you can definitely take down half this cake in a single sitting. But you probably shouldn’t. No judgment either way.

blackout

Chocolate Blackout Cake
Original recipe can be found here

Ingredients:

For the cake:
1 stick unsalted butter, plus extra for greasing pans
1 and 1/2 cups AP flour, plus extra for dusting pans
2 tsp baking powder
1/2 tsp baking soda
1/2 tsp salt
3/4 cup cocoa powder
1 cup strong black coffee
1 cup buttermilk
1 cup packed light brown sugar
1 cup granulated sugar
2 large eggs
1 tsp vanilla extract

For the chocolate pudding/filling:
1 and 1/4 cups granulated sugar
1/4 cup cornstarch
1/2 teaspoon salt
2 cups half and half
1 cup whole milk
6 oz unsweetened chocolate, chopped
2 tsp vanilla

Method:

For the cake:
1. Preheat your heat oven to 325 degrees.
2. Butter and flour two 8-inch cake pans, plus a mini loaf tin (you’ll want to have an extra “mini cake” on hand for the crumb topping).
3. Whisk together the flour, baking powder, baking soda, and salt. Set aside.
4. Melt the butter in a large saucepan over medium heat. Stir in the cocoa and cook until fragrant, about 1 minute.
5. Take the mixture off the heat and whisk in your coffee, buttermilk, and sugars until dissolved.
6. Whisk in your eggs and vanilla, and then slowly whisk in the flour mixture.
7. Pour some batter into the mini loaf pan until it’s about half-full. Then divide the remaining batter evenly between your 8-inch pans and bake for 30-35 minutes, or until an inserted toothpick comes out clean.
8. Let the cakes cool in their pans for about 15 minutes and then invert onto a wire rack to cool completely (at least one hour).

For the chocolate pudding/filling:
1. Whisk together your sugar, cornstarch, salt, half and half, and milk in a large saucepan.
2. Set the pan over medium heat. Add the chocolate and whisk constantly until the chocolate melts and the mixture begins to bubble. (The original recipe said this would take 2 to 4 minutes, but I let mine go for about double that time. You want the mixture bubbling pretty consistently; otherwise your pudding may not set up.)
3. Stir in your vanilla and transfer the pudding to large bowl.
4. Place plastic wrap directly on the surface of the pudding and refrigerate until cold, at least 4 hours and up to a full day. The plastic wrap is supposed to prevent a skin from forming. If you get one anyway, just scrape it off.

To assemble the cake:
1. Take the cake from the mini loaf pan and use your hands to crumble it into crumbs. Set aside.
2. Place the first cake layer on a platter and top with pudding. Sprinkle on crumbs.
3. Place the second cake layer on top of the filling and spread your remaining pudding evenly over the top and sides of the cake. Then sprinkle your remaining cake crumbs evenly over the top and sides of the cake, pressing lightly so that the crumbs stick.
4. Store the cake in the refrigerator. The recipe says it’ll keep for two days, but that depends on the speed at which you devour it. Again, no judgment either way.

blackoutslicejpg

Tres Leches Cake

It was my husband’s birthday this past weekend. And while I’m not really a birthday person, he usually enjoys a bit of extra attention when his birthday rolls around. So I did what any good wife who couldn’t find a babysitter would do: cooked up his favorite dinner and made not one, but two birthday cakes. Now since it’s just us plus a 16-month-old at home, that may seem a bit excessive. And it was. But it was also oh so delicious.

The first cake I made was a classic tres leches cake, partly because I know my husband likes it, and partly because his birthday is right before Cinco de Mayo, and, well, I thought it would be both cute and appropriate.

This cake is really easy to make if you have a stand mixer. If you don’t, it’ll take some effort to whip up your eggs and your cream. But it’s so worth it, because this cake is amazing. It’s fluffy, moist, and light—which actually makes it kind of dangerous if you lack self-control, which we all know I do. Even my husband couldn’t help but go back for seconds. And although I’m usually the world’s biggest hypocrite when it comes to letting my son eat sweets (as in, I can stuff my face with cake but he can’t have any), I decided to let him have some of this cake to celebrate the occasion. I tried to get a picture of him enjoying Daddy’s birthday cake, but my child is a vulture when it comes to food, and by the time I was able to bust out the camera, his cake was long gone.

treslechcake

Tres Leches Cake
Recipe from The Pioneer Woman

Ingredients:

For the cake:
1 cup AP flour
1 and 1/2 teaspoons baking powder
1/4 teaspoon salt
5 eggs, separated
1 cup granulated sugar, divided into 3/4 cup and 1/4 cup
1 teaspoon vanilla
1/3 cup whole milk

For the milk mixture:
1 can (12 ounces) evaporated milk
1 can (14 ounces) sweetened condensed milk
1/4 cup heavy cream

For the frosting:
2 cups heavy cream
3 tablespoons granulated sugar

Method:

For the cake:
1. Preheat your oven to 350 degrees. Spray a 9 x 13 inch pan liberally until coated.
2. Combine flour, baking powder, and salt in a large bowl and set aside.
3. Separate your eggs.
4. Beat egg yolks with 3/4 cup sugar on high speed until the yolks turn pale yellow.
5. Stir in milk and vanilla.
6. Pour egg yolk mixture over the flour mixture and stir very gently until combined.
7. Beat egg whites on high speed until soft peaks form. With the mixer on, pour in the remaining 1/4 cup sugar and beat until the egg whites are stiff but not dry.
8. Fold egg white mixture into the batter very gently until just combined.
9. Pour into prepared pan and spread to even out the surface.
10. Bake for 35 to 45 minutes, or until an inserted toothpick comes out clean. Turn cake out onto a rimmed platter and let cool.

For the milk mixture:
1. Combine the condensed milk, evaporated milk, and heavy cream in a small pitcher.
2. Once your cake is cool, pierce the surface with a fork several times. Slowly drizzle all but about 1 cup of the milk mixture over the cake (you can discard the rest, or get creative and save it for a future recipe). Try to get as much around the edges as you can. Allow the cake to absorb the milk mixture for 30 minutes.

For the frosting:
1. Whip the heavy cream and sugar until the mixture thickens.
2. Spread over the surface of the cake.

treslechslice

Caramel Cookie Dough Shortbread Bars

The other day, my 16-month-old locked me in my pantry. No, I’m not kidding.

I was standing in the doorway of my walk-in pantry, whose knob was set as locked to prevent my sneaky child from busting into my closed pantry behind my back and helping himself to whatever goodies he can reach. As I was combing the shelves looking for some caramel candies, the baby decided to sneak up behind me and start pushing the door into me. Now in all fairness, I didn’t try very hard to resist, thinking there was no way my little 16-month-old could possibly exert enough force to shove my body all the way into the pantry via the door. But lo and behold, I was wrong, ‘cause about eight seconds later, the child managed to push me all the way into the pantry, thus locking me in.

My husband, who was on hand for most of this scene, found it extraordinarily funny. Me, not so much. Actually, that’s not true. I laughed about it after the fact, but was also quite thankful that my husband was on hand to immediately bust me out.

Of course, this incident has caused me to rethink my strategy of keeping the child out of the pantry, and so going forward, I will not lock the door, but rather will use one of those annoying but necessary baby-proof knobs that makes opening things unbelievably difficult (for me) but will most likely do the job of keeping my junk food stash safe and out of my child’s mouth.

Anyway, once I recovered from my very brief moment of pantry incarceration, I got to work making these amazing shortbread cookie bars. I’ve done something similar in the past along the lines of classic Millionaires’ Shortbread, which is basically a shortbread base, caramel center, and chocolate glaze. But when I saw this recipe on Brown Eyed Baker, one of my absolute favorite baking blogs, I decided I had to go for it.

These bars are nothing short of amazing. I was actually worried that the cookie dough layer would make them a bit too sweet, but they turned out perfectly. The original recipe is enough for an 8×8 pan, but I wanted extra to bring in to work, so I made one and a half times the recipe to fill a 9×13. In hindsight, I could’ve stuck with the 8×8. These bars are wonderful, but they’re also incredibly rich, and believe it or not, you really only need a small piece to come away satisfied.

Although you do have the option of storing these beauties at room temperature, I decided to keep mine in the fridge and found that I enjoyed them cold—so much so, that my once-ample supply is now rapidly dwindling.

bilbarsjpg

Caramel Cookie Dough Shortbread Bars
Original recipe from Brown Eyed Baker

Ingredients:

For the shortbread base:
1/3 cup unsalted butter, at room temperature
1/3 cup granulated sugar
1/2 teaspoon vanilla extract (I used a little more to bring out the vanilla flavor)
1/4 teaspoon salt
1 cup AP flour

For the caramel layer:
7 ounces soft caramel candies (about 25 candies), unwrapped (I used Kraft caramels)
2 tablespoons heavy cream

For the cookie dough layer:
1/2 cup unsalted butter, at room temperature
1/2 cup light brown sugar
1/4 cup granulated sugar
2 tablespoons heavy cream
1/2 teaspoon vanilla extract
3/4 cup AP flour
Pinch of salt
1/2 cup semisweet chocolate chips

For the chocolate glaze:
4 ounces semisweet chocolate, chopped
1 tablespoon unsalted butter

Method:

To make the shortbread:
1. Preheat your oven to 350 degrees. Line an 8×8 inch baking pan with parchment paper, leaving some overhang on two sides.
2. Beat the butter and sugar with an electric mixer on medium speed until the mixture is light and fluffy, about 2-3 minutes.
3. Add the vanilla and salt, and beat until combined.
4. Add the flour and mix until just incorporated; the dough may appear slightly crumbly.
5. Firmly press the dough into your prepared pan. Bake for 18 to 22 minutes (22 to 25 minutes if you’re making enough for a 9×13 pan), or until the edges are lightly golden.
6. Remove pan from the oven and set on a wire rack to cool slightly.

To make the caramel layer:
1. Place the caramel candies in a small saucepan over medium heat. Add the heavy cream and stir until completely melted. (Disclaimer: I totally cheated and melted these together in the microwave. It turned out just fine, but I made sure to watch it carefully.)
2. Pour the caramel mixture over the shortbread crust and spread into an even layer.
3. Refrigerate until set, about one hour.

To make the cookie dough:
1. Combine the butter and sugars in a large mixing bowl and beat on medium speed until light and fluffy, about 2 to 3 minutes.
2. Add the heavy cream and vanilla and mix well.
3. Add the flour and salt, and mix on low until incorporated.
4. Stir in the chocolate chips.
5. Spread the cookie dough on top of the set caramel layer, using a spatula to smooth the dough into an even layer.
6. Refrigerate the pan while you prepare your glaze.

To make the chocolate glaze:
1. Combine the chocolate and butter in a microwave-safe bowl. Heat the mixture on 50% power in 30-second increments, stirring well after each, until it’s completely melted and smooth.
2. Spread the glaze over the cookie dough layer and chill in the fridge until set, about one hour.

To remove the bars from the pan, grasp the edges of the parchment paper and lift out the entire block. Place on a cutting board and use a sharp knife to cut into squares.

The original recipe says that these can be stored at room temp in an airtight container for up to three days. As I said, I opted to keep mine in the fridge. Don’t struggle with the decision too much; they’re delicious either way.