Peppermint Bark

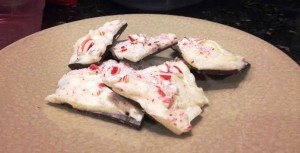
Peppermint bark is truly a staple item for me during the winter, right up there with hot cocoa and warm soup. Although there are several tasty store-bought versions of this classic treat, I usually like to whip up at least one homemade batch per season. In fact, I made my peppermint bark back in late December but am only first getting around to sharing the recipe and photos now. Blame my job, life, etc…

The great thing about homemade peppermint bark is that you can control the ratios of dark chocolate to white chocolate to peppermint to suit your taste. And it’s also way cheaper to make this stuff yourself than to buy it from your average retailer (though I’ll give you a little tip: Costco sells peppermint bark for a very reasonable price; the only problem is that it’s only available around the holidays). So go ahead: Make yourself a batch of peppermint bark and enjoy the fruits of your labor for several weeks to come (or days, if your self-control is similar to mine, as in non-existent).

pbark

Peppermint Bark

Ingredients:

10 ounces dark chocolate
10 ounces white chocolate
3/4 cup crushed candy cane bits, divided into two equal parts (more or less)
1/4 tsp peppermint extract

Method:

  1. Line a baking sheet with parchment paper.
  2. Using either a microwave or a double boiler, melt the dark chocolate until smooth. If you go the microwave route, zap your chocolate at 50% power and in 30-second increments, stirring well in between each round.
  3. Quickly pour half of the crushed candy cane bits into the melted dark chocolate, and stir.
  4. Add in peppermint extract, and stir again. Then, pour the dark chocolate mixture onto your prepared baking sheet and use a spoon or offset spatula to spread it out as needed.
  5. Place the baking sheet in the fridge for one hour.
  6. After an hour, remove the baking sheet and let it sit at room temperature while you melt your white chocolate.
  7. Using one of the above methods, melt the white chocolate until smooth.
  8. Use a spoon or offset spatula to spread the white chocolate over the dark chocolate-peppermint layer. Sprinkle remaining candy cane bits over white chocolate layer, using your fingers to press some of the bigger pieces in as needed.
  9. Place the baking sheet back in the fridge for an additional hour to allow the peppermint bark to set.
  10. This stuff keeps for quite some time in the fridge, and at room temperature my recent batch lasted about a week. It would’ve lasted even longer had I been able to control myself, but yeah, that didn’t happen.

Peanut Butter Blondies With Reese’s Pieces

Sometimes you have days where you’ve just got to have peanut butter. There’s no question about it. Yesterday was one of those days. After being cooped up during yet another snowstorm, I needed some peanut butter in my life, pronto. Enter these blondies. They’re only slightly different from the ones I made a few months back, but I like the playful color the Reese’s Pieces bring to the mix. Also, the candy coating from the Reese’s adds some crunch to an otherwise soft, chewy, and delicious blondie bar. If you’re craving peanut butter and stuck indoors, be kind to yourself and make a batch of these.

Reesesjpg

Peanut Butter Blondies With Reese’s Pieces

Ingredients:

1/4 cup (1/2 stick) butter, melted and cooled to room temp
1/4 cup peanut butter (smooth or chunky)
1/2 cup light brown sugar
1/2 cup granulated sugar
1 egg
1 tsp vanilla
1 cup AP flour
1/2 tsp salt
1 and 1/2 cups Reese’s Pieces

Method:

  1. Preheat your oven to 350 degrees. Grease an 8×8 baking pan and set aside.
  2. In a medium bowl, whisk together the melted butter, peanut butter, and sugars until well-combined.
  3. Beat in the egg (you can use a whisk or a fork for this) and vanilla; mix until well-incorporated.
  4. Stir in the flour and salt, mixing well.
  5. Stir in the Reese’s Pieces.
  6. Pour your batter into the prepared pan and bake for 22-25 minutes, or until an inserted toothpick comes out clean.
  7. Let the blondies cool in the pan (at least one hour) before slicing and serving.

Double Layer Chocolate Peanut Butter Brownies

Warning: If you don’t enjoy crazy, indulgent treats, stay away from these brownies. They really are kind of insane. But in a very good way.

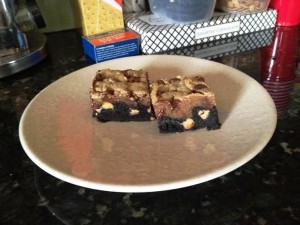
I was craving that chocolate-peanut butter combo but couldn’t decide whether to go for a brownie with peanut butter chips or a peanut butter blondie with chocolate chips. And then I thought, hey, why not combine the two? And that’s how these brownies were born. The bottom layer is a rich, dark chocolate brownie with peanut butter in the base and peanut butter chips generously intermingled, while the top layer is a moist peanut butter blondie studded with semisweet chocolate chips.

Although these brownies do essentially mean making two recipes in one, each batter is really quick and easy to throw together, and the end result is pretty impressive. So even if you’re short on time, if you’re craving chocolate and peanut butter and want something truly over-the-top, go ahead and make a batch of these.

crazybrownies

Double Layer Chocolate Peanut Butter Brownies

Ingredients:

For the brownie layer:

1 stick of butter, melted
1/2 cup granulated sugar
1/2 cup dark brown sugar
1/2 cup smooth peanut butter
1 large egg
1 tsp vanilla
1 cup AP flour
1/4 tsp salt
1/2 cup dark cocoa powder (I used Hershey’s Special Dark)
2 ounces bittersweet chocolate, melted and cooled slightly
3/4 cup peanut butter chips

For the peanut butter blondie layer:

1/4 cup (1/2 stick) butter, melted and cooled to room temp
1/4 cup smooth peanut butter
1/2 cup dark brown sugar
1/2 cup granulated sugar
1 egg
1 tsp vanilla
1 cup AP flour
1/2 tsp salt
3/4 cup semisweet chocolate chips

Method:

For the brownie layer:

  1. Preheat your oven to 350 degrees. Grease an 8×8 baking pan and set aside. (You can also use a 9×9 pan – your brownies won’t be quite as tall, but that’s okay.)
  2. In a large bowl, whisk together the butter, sugars, egg, and vanilla. Stir in peanut butter and melted chocolate, then set aside.
  3. In a small bowl, combine the flour, salt, and cocoa powder.
  4. Mix the dry ingredients into the wet until well-combined.
  5. Stir in the peanut butter chips.
  6. Pour the batter into your prepared pan, using an offset spatula to smooth out the top.

For the peanut butter blondie layer:

  1. In a medium bowl, whisk together the butter, peanut butter, and sugars.
  2. Beat in the egg and vanilla until well-incorporated (you can do this with a whisk or even a fork).
  3. Stir in the flour and salt, mixing well.
  4. Stir in the chocolate chips.
  5. Using a offset spatula, spread the peanut butter blondie layer over the brownie layer.
  6. Bake for 35-40 minutes, or until an inserted toothpick comes out clean, or with only a few moist crumbs.
  7. Let the brownies cool in the pan before cutting and slicing. I recommend holding out two hours if you can, but make sure to leave these for at least a solid hour to set up.

Dark Chocolate Cookies With White Chocolate Chips

Is it ever going to stop snowing around here? Yesterday was so nice I decided to take my son out for a walk…and today it’s snowing again. It’s snowing a lot. And I’m tired of it. Thank goodness I have cookies. Cookies make everything better.

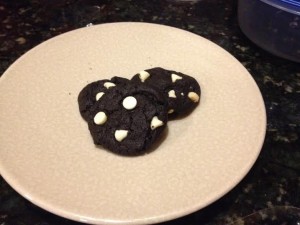
These cookies are really easy to make, and I like the contrast of the white chocolate chips with the dark chocolate base. I especially like dipping these babies in hot chocolate while watching the snow fall from the comfort of my living room.

darkchoccookies

Dark Chocolate Cookies With White Chocolate Chips

Ingredients:

1 cup butter, softened (but not melted)
2 cups granulated sugar
2 large eggs
2 teaspoons vanilla
2 cups AP flour
3/4 cup dark cocoa (I used Hershey’s Special Dark)
1 teaspoon baking soda
3/4 teaspoon salt
1 and 1/2 cups white chocolate chips

Method:

  1. Preheat your oven to 350 degrees. Very lightly grease a few baking sheets and set aside.
  2. In a large bowl, cream together the butter and sugar until smooth.
  3. Beat in the eggs one at a time, then stir in the vanilla.
  4. In a separate bowl, whisk together the flour, cocoa, baking soda, and salt. Pour the dry ingredients into the wet and mix until well-combined.
  5. Stir in the white chocolate chips.
  6. Drop the dough by rounded spoonfuls onto your cookie sheets.
  7. Bake for 9-11 minutes, or until the outsides of the cookies get crisp (the centers may still be somewhat soft but they will firm up during the cooling process).
  8. Remove the cookie sheets from the oven and let the cookies rest on the sheets for two minutes; then transfer the cookies to a rack to cool completely.