Oatmeal Chocolate Peanut Butter Bars

We’ve had a bit of a heat wave lately here in New Jersey. And for the record, I knew this was going to happen. See, most years we get at least a little taste of that wonderful season called “spring.” You know, when the sun comes out and the temps are warm enough for you to walk around outside in a t-shirt without being too hot or too cold. Well, this year we basically had cold, often-rainy weather up until a couple of days ago. Then it turned hot. Really hot. I’m talking 85-degree, smog in the air hot. It’s the type of weather where my naturally curly hair doesn’t stand a chance (not that I’m above pulling it back into a bun or slapping a baseball cap on top of my head, but there’s just something about massive, uncontrollable humidity-induced frizz that makes my self-esteem take a bit of a hit) and the simple act of walking down the street is enough to make you reach for a Gatorade.

In weather like this, all I ever really want to eat is yogurt, cereal, and ice cream. And the last thing I want to do is slave over a hot stove or even contemplate turning on my oven. But alas, my desire to put something in my stomach other than pure dairy got the better of me, and so I decided to bake up some quick oatmeal bars.

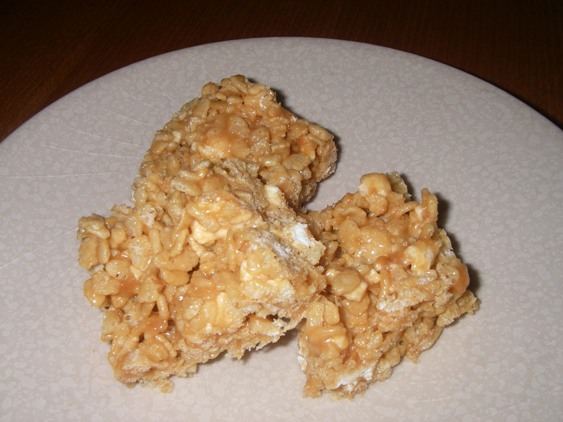
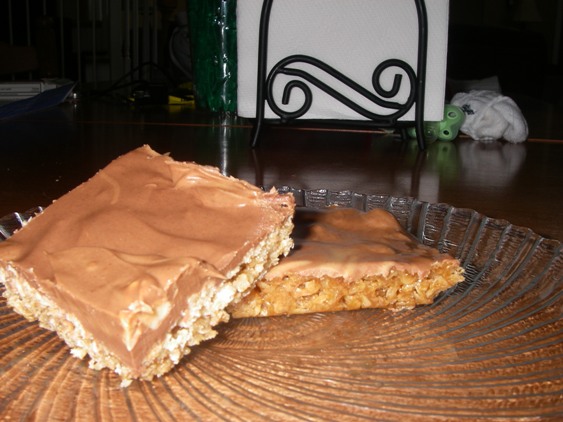
The good thing about this recipe is that it’s just about the easiest thing ever. You don’t need fancy equipment or a ton of ingredients, and your oven stays on for only a short amount of time. While some people might refer to these babies as oatmeal cookie bars, to me, they’re more like candy bars. The only downside to making them smack in the middle of a heat wave is that the tops have a tendency to melt if you’re cheap and stubborn like me and refuse to run your air conditioner (though I eventually caved). In fact, you’ll definitely want to store these in the fridge, no matter the season. But if you like chewy, chocolate peanut butter candy bars, you’ll definitely want to whip up a batch of these. Just be careful offering them up to neighbors, coworkers, and friends—you may be surprised at what little you have left for yourself.

oatmealcandybars

Oatmeal Chocolate Peanut Butter Bars

Ingredients:

For the base:
4 cups of quick-cooking oats
1 cup dark brown sugar
3/4 cup butter, melted
1/2 cup corn syrup

For the topping:
1 cup milk chocolate, chopped (it’s okay to use chocolate chips)
1 cup peanut butter
1/2 cup peanuts, chopped

Method:

For the base:
1. Preheat your oven to 350 degrees. Grease a 9×13 pan and set aside. Using a wooden spoon, combine the oats, brown sugar, butter, and corn syrup.
2. Press the mixture into your prepared pan and bake for 10-12 minutes.
3. Allow the base to cool completely (at least 30 minutes) before adding the topping.

For the topping:
1. Combine the chocolate and peanut butter in a small bowl and melt in the microwave at 50% power for 30-second increments, stirring in between each. Once the mixture is smooth, immediately stir in the peanuts and then use an offset spatula to spread the topping over the base.
2. Place the bars in the fridge to set, at least one hour.
Keep these bars stored in the fridge, not at room temp. They happen to taste really good cold, but if you’d prefer them a little warmer and chewier, just take them out about 15-30 minutes before you want to eat them. I don’t recommend microwaving them to warm them up, as the topping has a tendency to melt quickly.


M&M Sugar Cookies

Do you like M&Ms? I do. In fact, I think they’re wonderful. And while I’m definitely happy to eat them on their own, there’s just something about the presence of M&Ms in baked goods that makes me feel like a kid again.

It had been awhile since I’d made cookies, so I decided to try this recipe for M&M cookies. The process was fairly quick and easy, and the cookies came out tasting really yummy in the end. My only gripe is that they didn’t wind up as soft and chewy as I would’ve liked—but I blame myself for that, not the recipe.

If you’re looking for a fun cookie recipe to try, give this one a shot. Even if your cookies end up a little more on the crispy side like mine did, you’ll probably still get plenty of takers when you offer them up. I even caved and let the baby have a bite of one. Not shockingly, he loved it.

mandmcook

M&M Sugar Cookies
Recipe from Tracey’s Culinary Adventures

Ingredients:
2 and 1/4 cups AP flour
1 teaspoon baking powder
1/2 teaspoon baking soda
1/2 teaspoon salt
1 and 1/2 cups sugar, plus 1/3 cup for rolling
2 oz cream cheese, cut into 8 pieces
6 tablespoons unsalted butter, melted and still warm
1/3 cup vegetable (or canola) oil
1 large egg, at room temperature
1 tablespoon milk
2 teaspoons vanilla extract
1 and 1/4 cup M&Ms

Method:
1. Preheat your oven to 350 degrees. Line 2 or 3 baking sheets with parchment paper (see note below).
2. In a medium bowl, whisk together the flour, baking powder, baking soda, and salt.
3. Combine 1 1/2 cups of sugar and cream cheese in a large bowl (no need to stir them together yet).
4. Put the remaining 1/3 cup sugar in a pie plate and set aside.
5. Pour the warm butter over the cream cheese mixture and whisk to combine. The mixture won’t be completely smooth yet, and that’s okay.
6. Whisk in the oil, and then whisk in the egg, milk, and vanilla extract. Mix until smooth.
7. Use a rubber spatula to start folding the dry ingredients into the wet. When the dry ingredients are partially incorporated, add 3/4 cup of the M&Ms to the dough. Continue mixing until a soft dough comes together. (Don’t wait to add the M&Ms until the dry ingredients are completely incorporated, or you’ll end up over-mixing.)
8. Portion the dough onto the prepared baking sheets with a cookie scoop. Working quickly (if you handle the dough too much, you’re more likely to wind up with flat cookies—which is what happened to me), roll the dough into a ball with your hands, and then roll in the sugar set aside in the pie plate. Repeat until you’ve used all of the dough, placing 12 cookies on each baking sheet. Use the bottom of a glass to flatten the dough balls into discs that are about 2 inches in diameter (or don’t, and see if this helps your cookies come out softer and fluffier). Gently press 2 or 3 more M&M’s into the top of each cookie.
9. Bake the cookies for 11-13 minutes, or until the edges are set. The tops will be puffy and slightly cracked.
10. Transfer the baking sheet to a wire rack and let the cookies cool on the sheet for 5 minutes; then transfer them to the rack to cool completely.

Note: The original recipe says it’ll yield about 24 cookies, but I easily got 36 decent-sized cookies out of this batch.

Caramel Tres Leches Rice Krispies Treats, or What to Do With Leftover Tres Leches Mix

Remember that delicious tres leches cake I made recently? Well, the one annoying thing about the recipe is that it calls for about a cup of that yummy milk mixture to be discarded. Since I don’t like letting any type of food go to waste, I decided to get creative in finding a way to repurpose some of what I had leftover. And hence these caramel tres leches Rice Krispies treats were born.

This recipe is incredibly easy to whip up. It only takes a few minutes, and there’s no actual baking involved. The only thing is that the cleanup can be a little messy…and the bars themselves, though wonderfully tasty, did end up coming out a little sticky. But if you do what I did and cover them individually with plastic wrap, you’ll have a nice little snack supply on hand.

Incidentally, I still have some more of that milk mixture left over, so if anyone has any ideas on what to do with it before it goes bad in my fridge, I’m all ears.

rktreats

Caramel Tres Leches Rice Krispies Treat

Ingredients:
1 and ½ cups Rice Krispies cereal
1 cup miniature marshmallows
About 20 Kraft caramel candies, unwrapped
3 tablespoons tres leches mix (heavy cream, evaporated milk, and condensed milk combined)

Method:
1. Line an 8×8 baking pan with parchment paper.
2. Combine the caramel candies and tres leches mix and heat in the microwave or on the stovetop until the caramels have melted and the mixture starts to bubble slightly.
3. Stir in marshmallows and cereal, making sure to coat the cereal well.
4. Pour the mixture into your prepared pan and refrigerate until set, about one hour. Cut into squares and enjoy.