Peppermint Bark

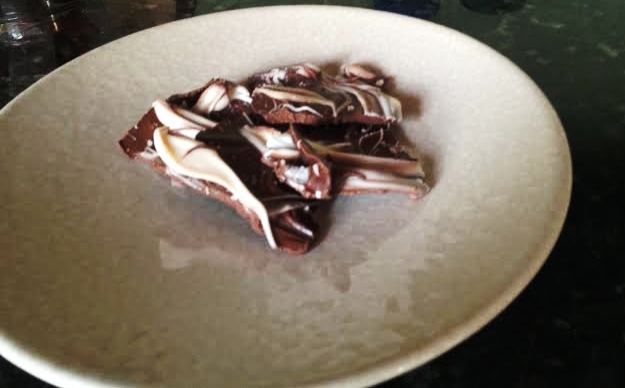
Peppermint bark is truly a staple item for me during the winter, right up there with hot cocoa and warm soup. Although there are several tasty store-bought versions of this classic treat, I usually like to whip up at least one homemade batch per season. In fact, I made my peppermint bark back in late December but am only first getting around to sharing the recipe and photos now. Blame my job, life, etc…

The great thing about homemade peppermint bark is that you can control the ratios of dark chocolate to white chocolate to peppermint to suit your taste. And it’s also way cheaper to make this stuff yourself than to buy it from your average retailer (though I’ll give you a little tip: Costco sells peppermint bark for a very reasonable price; the only problem is that it’s only available around the holidays). So go ahead: Make yourself a batch of peppermint bark and enjoy the fruits of your labor for several weeks to come (or days, if your self-control is similar to mine, as in non-existent).
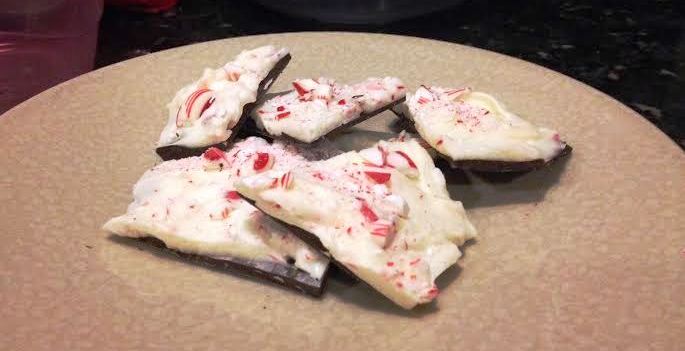
pbark

Peppermint Bark

Ingredients:

10 ounces dark chocolate
10 ounces white chocolate
3/4 cup crushed candy cane bits, divided into two equal parts (more or less)
1/4 tsp peppermint extract

Method:

  1. Line a baking sheet with parchment paper.
  2. Using either a microwave or a double boiler, melt the dark chocolate until smooth. If you go the microwave route, zap your chocolate at 50% power and in 30-second increments, stirring well in between each round.
  3. Quickly pour half of the crushed candy cane bits into the melted dark chocolate, and stir.
  4. Add in peppermint extract, and stir again. Then, pour the dark chocolate mixture onto your prepared baking sheet and use a spoon or offset spatula to spread it out as needed.
  5. Place the baking sheet in the fridge for one hour.
  6. After an hour, remove the baking sheet and let it sit at room temperature while you melt your white chocolate.
  7. Using one of the above methods, melt the white chocolate until smooth.
  8. Use a spoon or offset spatula to spread the white chocolate over the dark chocolate-peppermint layer. Sprinkle remaining candy cane bits over white chocolate layer, using your fingers to press some of the bigger pieces in as needed.
  9. Place the baking sheet back in the fridge for an additional hour to allow the peppermint bark to set.
  10. This stuff keeps for quite some time in the fridge, and at room temperature my recent batch lasted about a week. It would’ve lasted even longer had I been able to control myself, but yeah, that didn’t happen.

Avalanche Bark – Er, Balls

Have you tried Avalanche Bark yet? In case you’re not familiar with it, Avalanche Bark is a concoction that comes to us courtesy of the tasty and wonderful Rocky Mountain Chocolate Factory. A year or so ago, I stumbled upon a recipe for it on one of my favorite baking blogs, and I’ve been making my version of it ever since.

The best way to describe this creation is a jacked-up Rice Krispies treat. If you like those, you’re pretty much guaranteed to love Avalanche Bark. And the recipe itself couldn’t be easier. The only problem is that I sometimes have trouble cutting these into nicely formed squares – which is why I decided to improvise when my last batch came apart on me a lot during the portioning process. So half of my Avalanche Bark became Avalanche Balls. And you know what? That really didn’t end up being a problem.

Avbark

Avalanche Bark

Recipe from Brown Eyed Baker

Ingredients:

12 ounces white chocolate, finely chopped
1/2 cup smooth peanut butter
1 and 1/2 cups Rice Krispies
1 and 1/2 cups miniature marshmallows
1/2 cup miniature chocolate chips

Method:

  1. Line an 8×8 baking pan with parchment paper and set aside. Place the miniature chocolate chips on a plate and store in the freezer until ready to use.
  2. Combine the white chocolate and peanut butter in a medium bowl and microwave on 50% power in 30-second increments, stirring after each zap, until completely melted. Remove from microwave, stir in Rice Krispies, and let the mixture cool for about 15-20 minutes.
  3. Stir in the miniature marshmallows followed by the miniature chocolate chips.
  4. Pour the mixture into your prepared pan and press into an even layer. Refrigerate for 30 minutes, or until set.
  5. Use a very sharp knife to cut into squares. If your mixture comes apart on you, don’t worry – just use your fingers to form it into balls and stick your new creations back into the fridge to reset that way.
  6. Store your Avalanche Bark in the fridge in an airtight container. It’ll keep for several days if you don’t devour it first.

avballs


And here’s the bite-sized ball version. Part of me almost likes these better. Maybe I’ll make them this way on purpose the next time around.

White Chocolate Pistachio Cranberry Bark

So yeah, clearly I’ve been making (and, ahem, eating) a lot of holiday candy lately. The latest offering I have to share with you is this delicious white chocolate bark studded with dried cranberries and pistachios. I’ve seen and tried the white chocolate-cranberry-pistachio combo in everything from candy to cookies to blondies to cake, and it seems to work magically every time. And as is the case with many of my bark recipes, this one is incredibly easy to pull off. If you’re looking for a yummy holiday snack to bring to a party, this one is sure to enhance the festivities.

craisinpistachio

White Chocolate Pistachio Cranberry Bark

Ingredients:

2 cups white chocolate morsels or melting discs
3/4 cup chopped pistachios, plus 1/4 cup for topping
3/4 cup dried cranberries, plus 1/4 cup for topping

Method:

  1. Line a baking sheet with parchment paper and set aside.
  2. Melt the white chocolate using either a double boiler or the microwave at 50% power for 30-second increments. Pay attention to your chocolate and remove it from the heat once it’s mostly melted (if needed, use a spoon to stir any remaining lumps until they’re totally melted and well-integrated).
  3. Once your chocolate is melted, quickly stir in 3/4 cup pistachios and 3/4 cup dried cranberries.
  4. Pour the chocolate mixture onto the prepared baking sheet, using the back of a spoon or a spatula to spread it evenly.
  5. Sprinkle the remaining 1/4 cup pistachios and 1/4 cup dried cranberries on top.
  6. Place the baking sheet in the fridge and leave for at least one hour to set before breaking into pieces.

Chocolate Nutella Sea Salt Bark

I’m not really a salty snack kind of person. Put a bag of chips in front of me, and I’ll most probably pass. But what I do love is that classic salty-sweet combination, and so I decided to create a candy bark that offered up the best of both worlds. Enjoy!

nutellabark

Chocolate Nutella Sea Salt Bark

Ingredients:

1 cup milk chocolate morsels or melting discs
1 cup semisweet chocolate morsels or melting discs
2/3 cup Nutella
1/2 cup white chocolate morsels or melting discs
Pink Himalayan sea salt, for topping

Method:

  1. Line a baking sheet with parchment paper and set aside.
  2. Combine the milk chocolate, semisweet chocolate, and Nutella in a medium bowl and melt in the microwave at 50% power for 30-second increments. Pay attention to the mixture and remove it from the heat once it’s mostly melted.
  3. Pour the mixture onto the prepared baking sheet, using the back of a spoon or a spatula to spread it evenly.
  4. Melt the white chocolate using the methods described above.
  5. Once melted, use the back of a spoon or a knife to swirl it around on top of the milk chocolate layer.
  6. Sprinkle sea salt generously on top.
  7. Place the baking sheet in the fridge and leave for at least one hour to set before breaking into pieces.

Caramel Coconut Cashew Bark

Can you tell how much I just love candy? The latest installment in my holiday baking rotation is this awesome caramel coconut cashew bark. Imagine rich dark chocolate stuffed and topped with slightly salty cashews, gooey caramel, and heavenly toasted coconut. I mean, really, does it get much better?

coccashew

Caramel Coconut Cashew Bark

Ingredients:

2 cups dark chocolate morsels or melting discs
3/4 cup chopped cashews
2/3 cup caramel sauce (you can make your own by combining about 12 Kraft caramel candies with a tablespoon of milk or cream), divided in half
1 cup toasted coconut

Method:

  1. Line a baking sheet with parchment paper and set aside.
  2. Melt the dark chocolate using either a double boiler or the microwave at 50% power for 30-second increments. Pay attention to your chocolate and remove it from the heat once it’s mostly melted. If you leave it too long, your chocolate could seize on you.
  3. Once melted, quickly stir in the chopped cashews and 1/3 cup caramel sauce.
  4. Pour the chocolate mixture onto the prepared baking sheet, using the back of a spoon or a spatula to spread it evenly.
  5. Use the back of a spoon or a knife to swirl the remaining 1/3 cup caramel sauce on top of the chocolate layer.
  6. Quickly sprinkle the toasted coconut on top, using your hands as needed to press it into the mixture.
  7. Place the baking sheet in the fridge and leave it for at least one hour to set before breaking into pieces.

Chocolate Macadamia Toffee Bark

As I mentioned earlier this week, I’ve been deep into candy-making mode. The great thing about making your own holiday bark is that you can feel free to get as creative as you’d like with the flavors and textures you most enjoy. Along these lines, I present my chocolate macadamia toffee bark: an easy recipe to follow, and a delicious one to snack on once it’s done.

Chocolate Macadamia Toffee Bark

mactoffeebarj

Ingredients:

2 cups milk chocolate morsels or melting discs
1 cup chopped macadamia nuts
2/3 cup toffee bits, plus another 1/3 cup for topping
3/4 cup white chocolate morsels or baking discs

Method:

  1. Line a baking sheet with parchment paper and set aside.
  2. Melt the milk chocolate using either a double boiler or the microwave at 50% power for 30-second increments. Pay attention to your chocolate and remove it from the heat once it’s mostly melted. If you leave it too long, your chocolate might seize.
  3. Once melted, quickly stir in the chopped macadamia nuts and 2/3 cup toffee bits.
  4. Pour the chocolate mixture onto the prepared baking sheet, using the back of a spoon or a spatula to spread it evenly.
  5. Melt the white chocolate using the methods described above.
  6. Once melted, use the back of a spoon or a knife to swirl it around on top of the milk chocolate layer.
  7. Sprinkle remaining 1/3 cup toffee bits on top of the newly poured white chocolate, using your fingers to press in the bits as needed to get them to stick.
  8. Place the baking sheet in the fridge and leave for at least one hour to set before breaking into pieces.

Chocolate Almond Cranberry Bark

Up until recently, I’d spend much of the holiday season racking my brain trying to come up with great presents for my family members, friends, co-workers, and so forth. But a couple of years ago, I had the idea to forego store-bought gifts in favor of homemade candy.

Now I will say that from a time-related perspective, this move didn’t do me many favors. Making batch after batch of candy and confections is a time-consuming process, and then once the stuff is made you still have to package it up all nice and pretty. But from a crowd-pleasing perspective, homemade candy for the holidays is one of the best ideas I’ve ever had. And although candy-making does take some time, most of the recipes I use are super easy. And as an added bonus, you get to keep some of the candy for yourself, or at least taste little bits and pieces along the way.

cranbark

Chocolate Almond Cranberry Bark

Ingredients:

2 cups dark chocolate morsels or melting discs
2/3 cup slivered almonds, plus another 1/4 cup for topping
2/3 cup dried cranberries, plus another 1/4 cup for topping

Method:

  1. Line a baking sheet with parchment paper and set aside.
  2. Melt the dark chocolate using either a double boiler or your microwave at 50% power for 30-second increments. Pay attention to your chocolate and remove it from the heat once it’s mostly melted. Leave it too long, and your chocolate will seize.
  3. Once melted, mix in 2/3 cup almonds and 2/3 cup dried cranberries.
  4. Pour the chocolate mixture onto the prepared baking sheet, using the back of a spoon or a spatula to spread it evenly.
  5. Quickly sprinkle the remaining almonds and dried cranberries on top.
  6. Place the baking sheet in the fridge and leave for at least one hour to set. Use your hands to break up the set mixture into fun, festive pieces of bark.

Holiday Chocolate Chip Sugar Cookies

More often than not, I tend to forego traditional cookies in favor of cookie bars. I just find that they’re quicker and easier to make, store, and transport. But as yummy as my bars tend to be, there’s just something about that classic cookie shape that screams “holiday season” to me. So in the spirit of wanting to spread some joy around the office this week, I brought in a batch of sugar cookies with chocolate chips.

As far as cookie recipes go, this one couldn’t be simpler. It’s your basic sugar cookie flavored with vanilla and studded with festive holiday chocolate chips (if you can’t find the red and green chips in the supermarket, you could always use regular chips or red and green M&Ms instead). Also, chilling the dough in the fridge is optional, but recommended. I know some people don’t like having to chill dough because it makes the process take longer, but I found that a quick 10-minute chill was all it took to get this last batch just right.

holsugcookies

Holiday Chocolate Chip Sugar Cookies

Ingredients:

1 and 1/2 cups AP flour
1/2 tsp baking soda
1/4 tsp baking powder
1/8 tsp salt
1/2 cup butter
3/4 cup granulated sugar
1 egg
1 tsp vanilla
1 and 1/2 cups chocolate chips

Method:

  1. Preheat your oven to 375 degrees.
  2. In a medium bowl, cream together the butter and sugar until light and fluffy. Beat in the egg, and then stir in the vanilla.
  3. In a separate bowl, whisk together the four, baking soda, baking powder, and salt. Gently stir the dry ingredients into the wet until well-combined. Then, stir in chocolate chips.
  4. Refrigerate dough for 10-15 minutes. In the meantime, prepare several baking sheets.
  5. Remove the dough from the fridge and use your hands to form small rounded discs. Be sure to leave enough space for the cookies to spread.
  6. Bake for 10-12 minutes, until the edges begin to turn golden. Let the cookies cool on their sheets for a minute or two before transferring to wire racks to cool completely.

Note: This recipe makes about 2 and 1/2 dozen cookies but can pretty easily be doubled if you’re feeding a larger crowd. These cookies will keep for a good 4-5 days if stored at room temperature in an airtight container.