Brown Velvet Cheesecake Cake

Normally I’m not a big fan of Valentine’s Day. And in all the years my husband and I have been together, I don’t think we’ve ever set foot in a restaurant on V-Day. (What can I say? We’re just not into spending extra money and being forced to order off a pre-fixed menu for no good reason.) But we do have a tradition of enjoying a nice home-cooked meal at the dining room table by candlelight on Valentine’s Day (as opposed to eating on the couch in front of the TV, which we’re definitely guilty of doing more often than we’d like to admit).

This year, I decided to make one of my husband’s favorite pasta dishes and go all out on dessert. My husband can be very picky when it comes to sweets, so I knew that if I wanted to wow him, it was going to have to be something special. Unfortunately, my hectic schedule during the week (you know, kid, job, laundry, the usual) didn’t really afford me the opportunity to spend that extra time slaving over the stove. So we decided to postpone Valentine’s Day until the weekend, which gave me the time I needed to prepare everything the way I wanted.

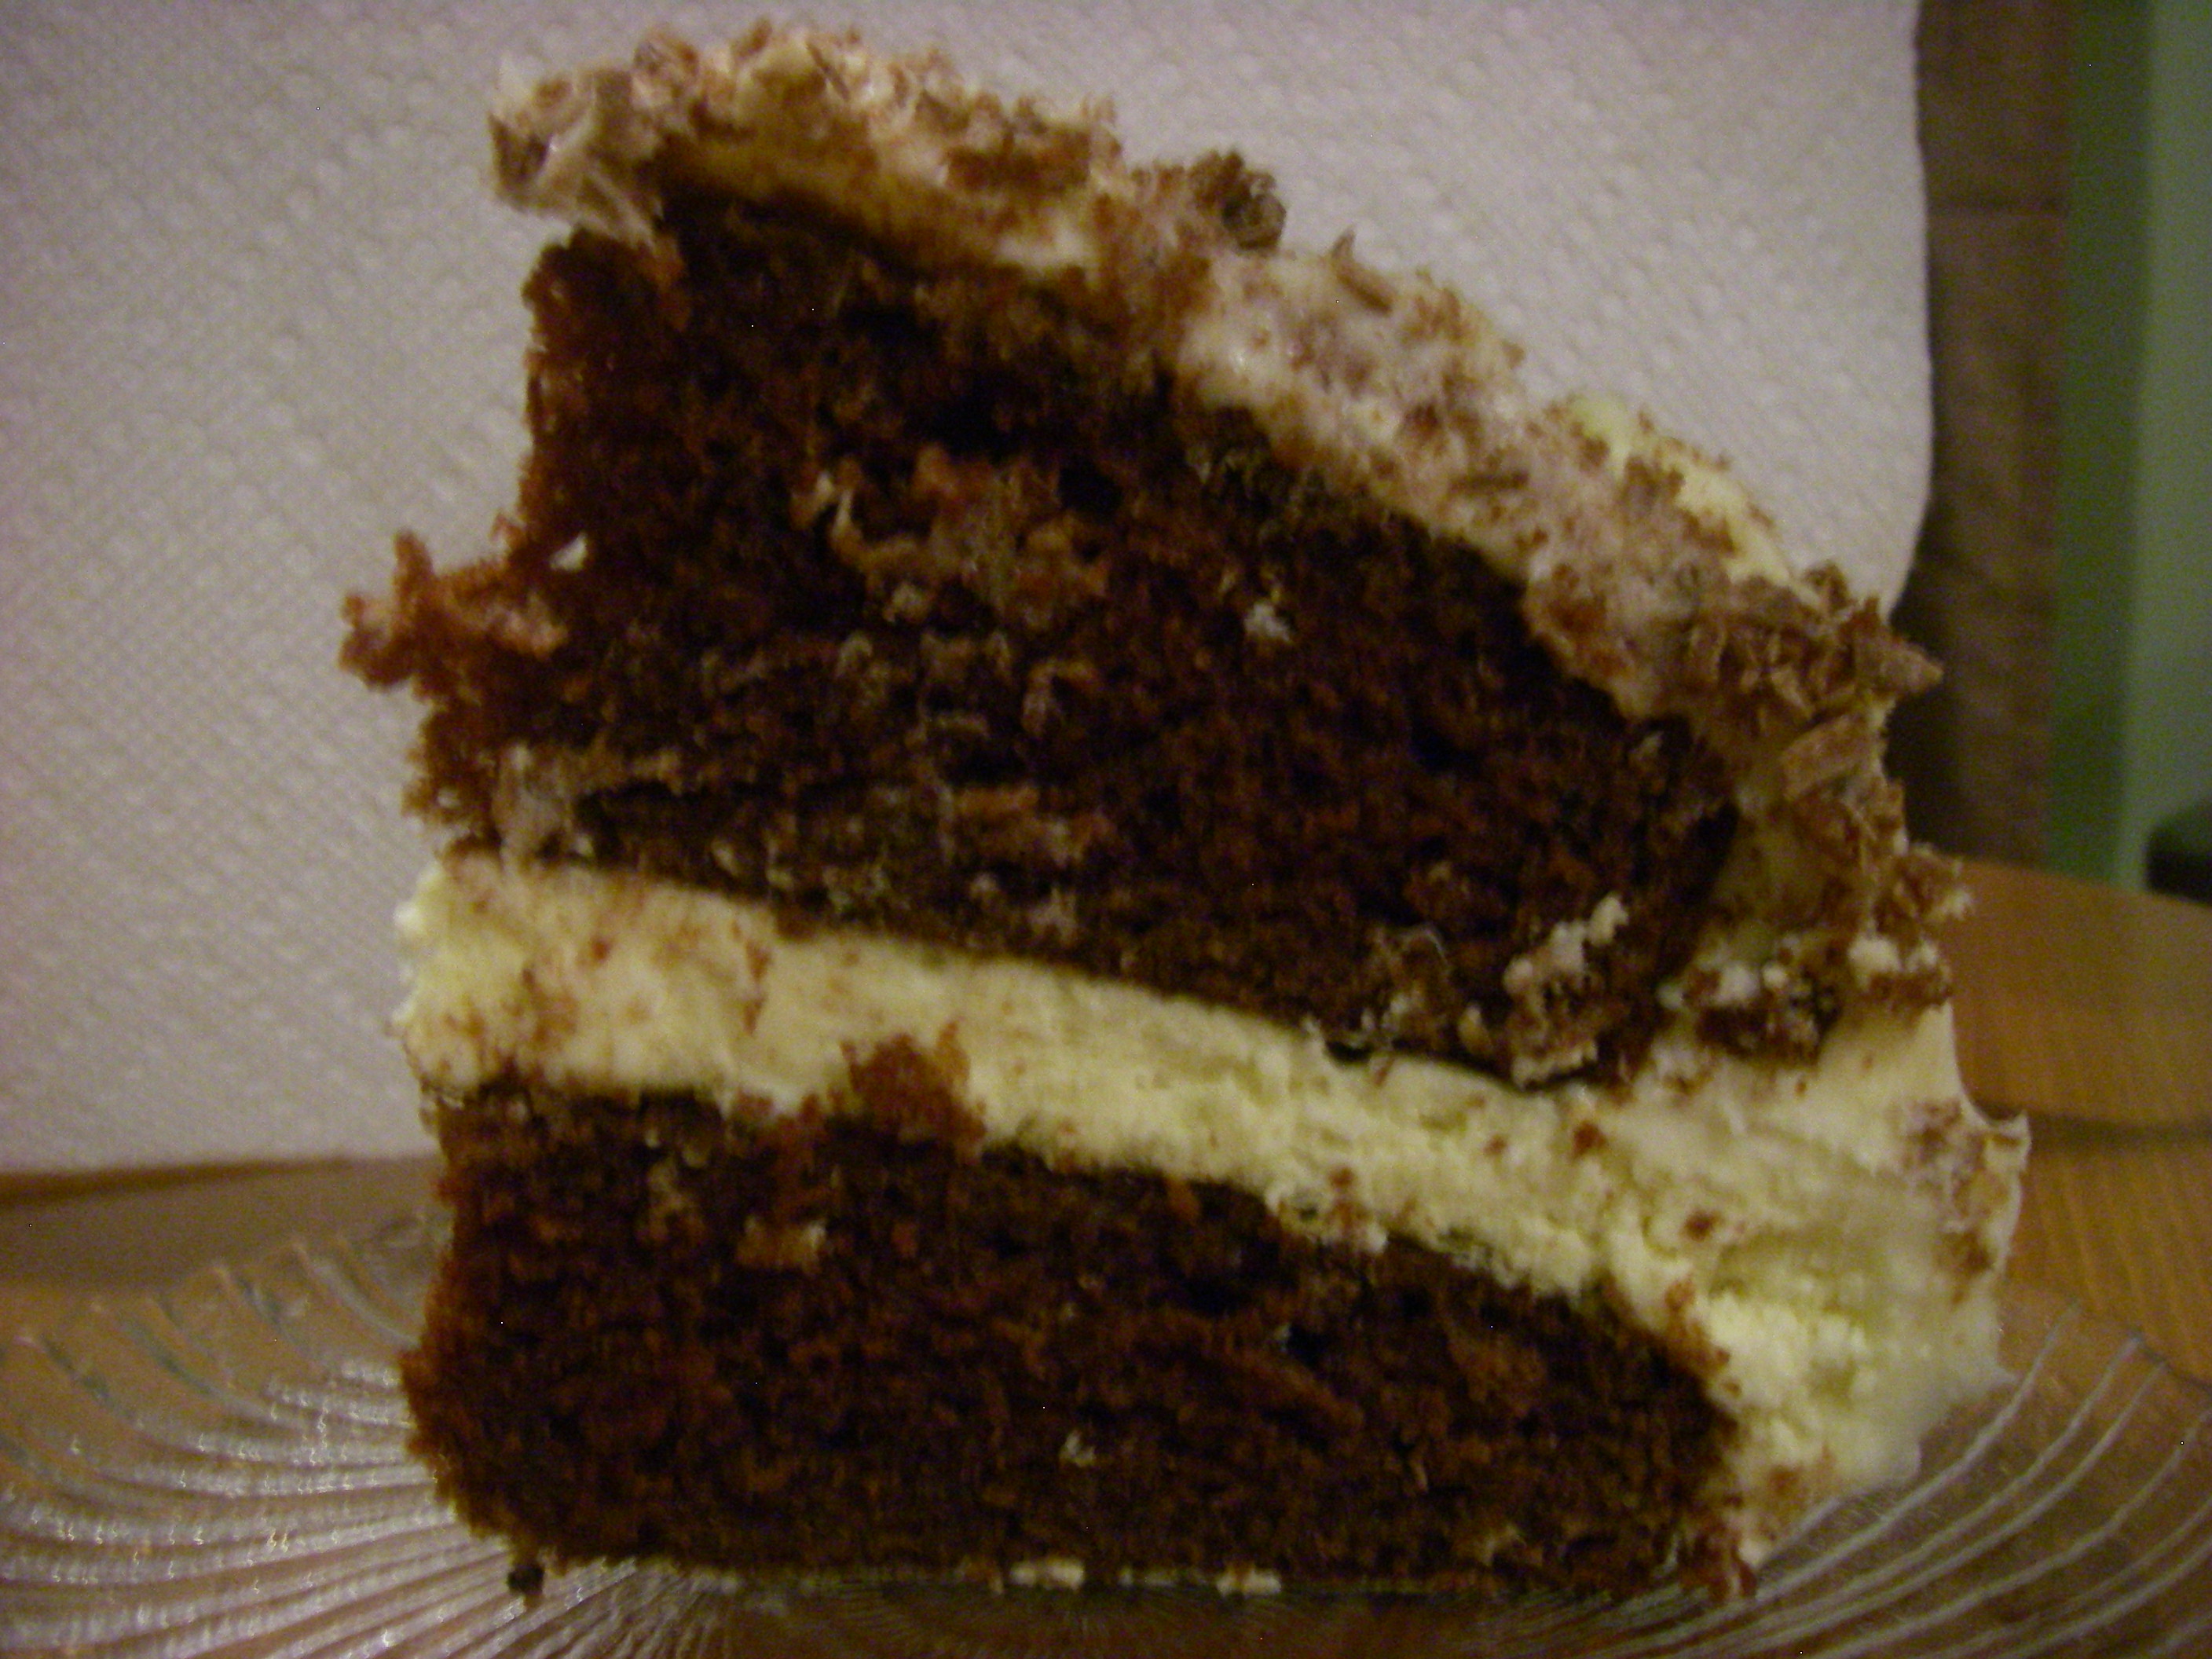
So about that dessert: I decided to make a brown velvet cheesecake cake. It’s basically your classic red velvet cake sans food coloring with a cheesecake layer in between, covered in cream cheese frosting. I figured it was appropriate for Valentine’s Day, but most importantly, that my husband would really enjoy it.

Why did I skip the red? For some people, that rich red color is what makes the cake special. For me, the red looks unnatural and is actually kind of a turnoff. So I decided to forego the food coloring and let the cocoa cake actually look like cocoa. And I’m glad I did, because my husband claims that the cake tasted better specifically because of that. I’m sure he’s just saying that to be nice, but I’ll take it.

IMGP1687

Brown Velvet Cheesecake Cake
From RecipeGirl

Ingredients:

For the cheesecake:
Two 8-ounce packages cream cheese, at room temperature
2/3 cup granulated sugar
pinch of salt
2 large eggs
1/3 cup sour cream
1/3 cup heavy whipping cream
1 teaspoon vanilla extract

For the brown velvet cake:
2 1/2 cups AP flour
1 and 1/2 cups granulated white sugar
3 tablespoons unsweetened cocoa powder
1 and 1/2 teaspoons baking soda
1 teaspoon salt
2 large eggs, at room temperature
1 and 1/2 cups vegetable or canola oil
1 cup buttermilk
2 teaspoons vanilla extract
2 teaspoons white vinegar

For the cream cheese frosting:
2 and 1/2 cups powdered sugar
Two 8-ounce packages cream cheese, at room temperature
1/2 cup unsalted butter, at room temperature
1 tablespoon vanilla extract

For topping:
A bar of chunk of chocolate to make shavings or curls, optional

Method:

For the cheesecake layer:
1. Preheat your oven to 325 degrees and boil a kettle of water. You’ll need this for a water bath.
2. Spray a 9-inch springform pan with nonstick spray and line the bottom with parchment paper. Wrap a double layer of foil around the bottom and up the sides of the pan, sealing it tightly so that water can’t get in.
3. In a large bowl, use an electric mixer to mix the cream cheese until it’s nice and smooth.
4. Add in sugar and salt and mix for about two minutes, scraping down the sides of the bowl as needed.
5. Add your eggs, one at a time, blending after each addition.
6. Mix in sour cream, whipping cream, and vanilla. Beat until smooth.
7. Pour the batter into the prepared pan. Set the pan into a larger pan (I used a roasting pan) in the pre-heated oven. Pour the hot water from your kettle into the roasting pan so that there’s about an inch of water coming up the foil along the sides of the cheesecake pan.
8. Bake the cheesecake for 45 minutes until it’s set to the touch and doesn’t jiggle.
9. Remove the cheesecake from the roasting pan and let it cool on a wire rack for at least an hour. Once cooled, place the pan into the freezer and let the cheesecake freeze completely. This can be done in several hours. (I made my cheesecake the day before I made the cake and left it in the fridge overnight. I then stuck it in the freezer for about an hour the next morning.)

For the cake layers:
1. Preheat your oven to 350 degrees . Grease and flour two 9-inch baking pans.
2. In a large bowl, whisk together the flour, sugar, cocoa powder, baking soda and salt.
3. Add eggs, oil, buttermilk, food coloring, vanilla and vinegar to the flour mixture. Using an electric mixer on medium-low speed, beat until blended (about one minute). Scrape down the sides and bottom of the bowl with a rubber spatula and then beat the mixture on high for two minutes.
4. Spread the batter evenly into the prepared pans and bake for 30 to 35 minutes, or until an inserted toothpick comes out clean.
5. Cool the cakes in their pans on a wire rack for 10 minutes; then run a knife around the edge of the pans and invert the cakes onto a rack to cool completely.

For the frosting:
1. In a large bowl, using an electric mixer on medium-high speed, beat powdered sugar, cream cheese, butter and vanilla until it is smooth and creamy.

To assemble the cake:
2. Place one cake layer into the center of a cake plate or platter.
3. Remove the cheesecake from the freezer, take off the sides of the pan, and slide a knife under the parchment to remove the cheesecake from the pan. Peel off the parchment.
4. Measure your cheesecake layer against the cake layers. If the cheesecake layer is larger, which it may be, place it on a cutting board and gently shave off some of the exterior to get it to be the same size as your cake layers. (Have a small dish on hand to collect the excess cheesecake—it makes a nice interim snack, trust me.)
5. Place the cheesecake layer on top of the first cake layer. Then place the second cake layer on top of the cheesecake.
6. Apply a layer of frosting to the top and sides of the cake, and then place the cake in the fridge for 30 minutes for the frosting to set.
7. After 30 minutes, remove the cake from the fridge and apply a second layer of frosting. Top with chocolate shavings or curls if desired (I topped my cake with milk chocolate; white chocolate also works well).
8. Store the cake in the fridge until you’re ready to serve it.

IMGP1691

White Chocolate Coconut Brownies

Sometimes, if you’re me, you find yourself in the mood for something insanely sweet yet easy to whip up. These brownies totally fit the bill. They took almost no time to throw together and didn’t require me to bust out the gadgets.

Now I will warn that the sweetness factor is intense. You’ll probably want to cut these into bites more so than bars or squares…unless you’re me, in which case you’ll want to stuff your face with way too large a piece for your own good.

I got the recipe from Brown Eyed Baker. If you haven’t visited this site yet, stop what you’re doing and check it out. This is definitely one of my go-to sources when I need a new dessert idea. Take a look and you’ll see why.

badpicbrownies

White Chocolate Coconut Brownies
Ingredients:
1 and 1/3 cups all-purpose flour
1 teaspoon salt
11 ounces white chocolate, chopped
2 sticks unsalted butter, cut into 1-inch pieces
1 and ½ cups white sugar
½ cup light brown sugar
5 eggs, at room temperature
2 teaspoons vanilla extract
1 cup shredded sweetened coconut

Method:
1. Preheat the oven to 350 degrees. Line a 9×13 pan with parchment paper and set aside.
2. Whisk the flour and salt together.
3. Melt the white chocolate and butter. Since I didn’t have a ton of time, I cheated and did this by putting the mixture in a glass bowl and microwaving it for 30-second increments at 50% power until it was ready. The original recipe suggests setting the white chocolate and butter mixture over a saucepan of simmering water to melt it properly.
4. Whisk in the white and brown sugars.
5. Whisk in the eggs one at a time
6. Stir in the vanilla extract.
7. Stir in the flour mixture and coconut using a rubber spatula—not a whisk.
8. Pour the batter into the prepared pan and use the spatula to smooth the top.
9. Bake for 30 minutes until a toothpick inserted comes out clean and the top looks nice and crispy.
10. Cool in the pan on a wire rack. Once cooled completely, you can lift the brownies out using the parchment paper and then cut them into small bites or squares.


Peanut Butter and Jelly Bars

Sometimes it pays to keep things simple flavor-wise. Case in point: the classic peanut butter and jelly combination. Growing up, PB&J sandwiches were a steady part of my school lunch rotation; and while I suppose I enjoyed them, they certainly didn’t stand out at the time as anything particularly special. But as I got older, I began to develop a fondness for PB&J. Maybe it’s because your coworkers look at you funny when you’re sitting around the break room table and they’re all eating their tandoori chicken takeout while you’re eating something they haven’t tasted since 1987. Or perhaps it’s because there’s just something about the awesome flavor combination that simply brings back memories of being a carefree kid.

Either way, peanut butter and jelly is a winner in my book, so it was only natural take the concept one step further by turning it into dessert. I found this Martha Stewart recipe and decided to give it a go, and the result was a batch of peanut butter and jelly bars that are good enough to make any adult feel like a kid again.

For some reason, these bars took a little longer to make than I initially expected. The peanut butter dough was really thick, and so I had to keep scraping down the sides of my mixer bowl and adjusting the speed up and down. And then it took me awhile to chop up the peanuts and make the crumbly dough topping, but that’s partly because for some strange reason, I love the feeling of balled-up dough in between my fingers and probably wasn’t in a particular rush to get the process over with.

This recipe makes a nice amount of PB&J bars—which means you’ll probably have enough left over to divvy up among your coworkers in exchange for their promise to stop mocking you for your peanut butter and jelly lunches, at least for the foreseeable future.

IMGP1649

Peanut Butter and Jelly Bars
Recipe from Martha Stewart

Ingredients:
1 cup (2 sticks) of unsalted butter, room temperature, plus more to butter the pan
3 cups of AP flour, plus more for the pan
1 and 1/2 cups granulated sugar
2 large eggs
2 and 1/2 cups smooth peanut butter
1 and 1/2 teaspoons salt
1 teaspoon baking powder
1 teaspoon vanilla extract
1 and 1/2 cups of your favorite jam flavor (I used strawberry and classic grape—I’ll explain)
2/3 cup salted peanuts, roughly chopped

Method:
1. Preheat your oven to 350 degrees. Grease a 9-by-13-inch pan with butter, and line the bottom with parchment paper. Grease the parchment, and coat inside of the pan with flour; set aside.
2. Place the butter and sugar in the bowl of an electric mixer fitted with the paddle attachment. Beat the mixture on medium-high until fluffy, about 2 minutes. Add eggs and peanut butter; beat on medium until well-combined (this took me about 3-4 minutes; the original recipe estimates 2).
3. Whisk together the salt, baking powder, and flour. Add dry ingredients to mixture and beat on low-medium speed until well-combined (this took me another 3-4 minutes, alternating between speeds).
4. Add vanilla and mix until incorporated.
5. Transfer 2/3 of the mixture to your prepared pan, and spread evenly.
6. With a spatula, spread jam on top of peanut-butter mixture. **
7. Crumble remaining peanut butter mixture on top of the jam layer, and sprinkle with peanuts.
8. Bake until the tops turn golden, about 45-55 minutes. (The inserted toothpick test doesn’t really work here because the jelly layer is always going to be gooey.)
9. Transfer to a wire rack and make sure to cool these completely before cutting into them. I stuck them in the fridge to set for about an hour and then left them out on my counter for another hour before slicing them up—and that totally did the trick.

**I wanted to see what these would taste like with both strawberry and grape jelly, so I decided to put strawberry over half of the base and grape over the other half. While I don’t think the two versions taste remarkably different from one another, I do like the way the strawberry version gives you a touch of tanginess while the grape bars really take you back to that classic old-school flavor. I also wound up with a few hybrid bars as a result of the strawberry and grape jellies melting into each other in the middle of the pan during the baking process, but happily, those tasted just as good as their individual strawberry or grape counterparts.