Normally I’m not a big fan of Valentine’s Day. And in all the years my husband and I have been together, I don’t think we’ve ever set foot in a restaurant on V-Day. (What can I say? We’re just not into spending extra money and being forced to order off a pre-fixed menu for no good reason.) But we do have a tradition of enjoying a nice home-cooked meal at the dining room table by candlelight on Valentine’s Day (as opposed to eating on the couch in front of the TV, which we’re definitely guilty of doing more often than we’d like to admit).
This year, I decided to make one of my husband’s favorite pasta dishes and go all out on dessert. My husband can be very picky when it comes to sweets, so I knew that if I wanted to wow him, it was going to have to be something special. Unfortunately, my hectic schedule during the week (you know, kid, job, laundry, the usual) didn’t really afford me the opportunity to spend that extra time slaving over the stove. So we decided to postpone Valentine’s Day until the weekend, which gave me the time I needed to prepare everything the way I wanted.
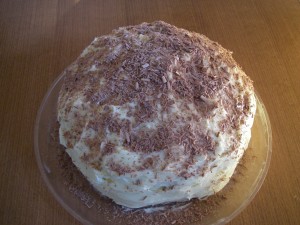
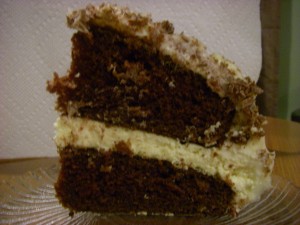
So about that dessert: I decided to make a brown velvet cheesecake cake. It’s basically your classic red velvet cake sans food coloring with a cheesecake layer in between, covered in cream cheese frosting. I figured it was appropriate for Valentine’s Day, but most importantly, that my husband would really enjoy it.
Why did I skip the red? For some people, that rich red color is what makes the cake special. For me, the red looks unnatural and is actually kind of a turnoff. So I decided to forego the food coloring and let the cocoa cake actually look like cocoa. And I’m glad I did, because my husband claims that the cake tasted better specifically because of that. I’m sure he’s just saying that to be nice, but I’ll take it.
Brown Velvet Cheesecake Cake
From RecipeGirl
Ingredients:
For the cheesecake:
Two 8-ounce packages cream cheese, at room temperature
2/3 cup granulated sugar
pinch of salt
2 large eggs
1/3 cup sour cream
1/3 cup heavy whipping cream
1 teaspoon vanilla extract
For the brown velvet cake:
2 1/2 cups AP flour
1 and 1/2 cups granulated white sugar
3 tablespoons unsweetened cocoa powder
1 and 1/2 teaspoons baking soda
1 teaspoon salt
2 large eggs, at room temperature
1 and 1/2 cups vegetable or canola oil
1 cup buttermilk
2 teaspoons vanilla extract
2 teaspoons white vinegar
For the cream cheese frosting:
2 and 1/2 cups powdered sugar
Two 8-ounce packages cream cheese, at room temperature
1/2 cup unsalted butter, at room temperature
1 tablespoon vanilla extract
For topping:
A bar of chunk of chocolate to make shavings or curls, optional
Method:
For the cheesecake layer:
1. Preheat your oven to 325 degrees and boil a kettle of water. You’ll need this for a water bath.
2. Spray a 9-inch springform pan with nonstick spray and line the bottom with parchment paper. Wrap a double layer of foil around the bottom and up the sides of the pan, sealing it tightly so that water can’t get in.
3. In a large bowl, use an electric mixer to mix the cream cheese until it’s nice and smooth.
4. Add in sugar and salt and mix for about two minutes, scraping down the sides of the bowl as needed.
5. Add your eggs, one at a time, blending after each addition.
6. Mix in sour cream, whipping cream, and vanilla. Beat until smooth.
7. Pour the batter into the prepared pan. Set the pan into a larger pan (I used a roasting pan) in the pre-heated oven. Pour the hot water from your kettle into the roasting pan so that there’s about an inch of water coming up the foil along the sides of the cheesecake pan.
8. Bake the cheesecake for 45 minutes until it’s set to the touch and doesn’t jiggle.
9. Remove the cheesecake from the roasting pan and let it cool on a wire rack for at least an hour. Once cooled, place the pan into the freezer and let the cheesecake freeze completely. This can be done in several hours. (I made my cheesecake the day before I made the cake and left it in the fridge overnight. I then stuck it in the freezer for about an hour the next morning.)
For the cake layers:
1. Preheat your oven to 350 degrees . Grease and flour two 9-inch baking pans.
2. In a large bowl, whisk together the flour, sugar, cocoa powder, baking soda and salt.
3. Add eggs, oil, buttermilk, food coloring, vanilla and vinegar to the flour mixture. Using an electric mixer on medium-low speed, beat until blended (about one minute). Scrape down the sides and bottom of the bowl with a rubber spatula and then beat the mixture on high for two minutes.
4. Spread the batter evenly into the prepared pans and bake for 30 to 35 minutes, or until an inserted toothpick comes out clean.
5. Cool the cakes in their pans on a wire rack for 10 minutes; then run a knife around the edge of the pans and invert the cakes onto a rack to cool completely.
For the frosting:
1. In a large bowl, using an electric mixer on medium-high speed, beat powdered sugar, cream cheese, butter and vanilla until it is smooth and creamy.
To assemble the cake:
2. Place one cake layer into the center of a cake plate or platter.
3. Remove the cheesecake from the freezer, take off the sides of the pan, and slide a knife under the parchment to remove the cheesecake from the pan. Peel off the parchment.
4. Measure your cheesecake layer against the cake layers. If the cheesecake layer is larger, which it may be, place it on a cutting board and gently shave off some of the exterior to get it to be the same size as your cake layers. (Have a small dish on hand to collect the excess cheesecake—it makes a nice interim snack, trust me.)
5. Place the cheesecake layer on top of the first cake layer. Then place the second cake layer on top of the cheesecake.
6. Apply a layer of frosting to the top and sides of the cake, and then place the cake in the fridge for 30 minutes for the frosting to set.
7. After 30 minutes, remove the cake from the fridge and apply a second layer of frosting. Top with chocolate shavings or curls if desired (I topped my cake with milk chocolate; white chocolate also works well).
8. Store the cake in the fridge until you’re ready to serve it.


