Vanilla and White Chocolate Mousse Cheesecake

Ever have a recipe bookmarked for ages that you’re just itching to try but don’t have the time to tackle?

Such was the case with this particular cheesecake. But let me backtrack a little, only to tell you how much I love cheesecake. Whether it’s the rich and dense kind or the type that’s light and airy, put it in front of me and I’ll be sure to devour it. And then go get myself another piece. And maybe a third one after that. Yes, I like cheesecake that much. And if there’s one flavor profile I also happen to adore, it’s the vanilla and white chocolate combo. Talk about heavenly. So when I found a cheesecake recipe that incorporated several of my favorite elements into one rich, indulgent dessert, I just had to give it a try…about six months later. That’s how long this recipe has been swirling around in my mind, just begging my stomach to give in and make it. But it finally happened. And it was well worth the wait.

Now I’ll warn you: This recipe is not a quick one. There are four separate steps, though two of them are fairly simple. Usually I don’t have the luxury of making multi-layered cakes, but between my son’s birthday and the holidays, I was in such a celebratory mood that I forced myself to make the time.

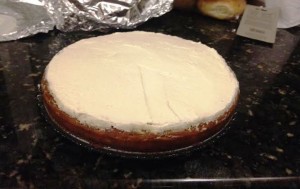
What you’ve got here is a classic, simple graham cracker crust topped with a rich layer of vanilla-flavored cheesecake. On top of that is a nice helping of white chocolate mousse, followed by a generous layer of vanilla whipped cream. In other words, pure and utter deliciousness on a plate, and well worth the multi-hour investment.

vbccake

Vanilla and White Chocolate Mousse Cheesecake

Recipe very slightly adapted from The Inner Gourmet

Ingredients:

For the crust:

1 and 1/2 cups crushed graham crackers
1/4 cup dark brown sugar
1/2 cup butter, melted
1 egg yolk, beaten
1/4 teaspoon vanilla

For the cheesecake layer:

16 ounces cream cheese, softened
1 cup sour cream
2 tablespoons corn starch
1 cup granulated sugar
1 stick unsalted butter, softened
1 stick salted butter, softened
2 teaspoons vanilla

For the white chocolate mousse:

1 cup whipping cream
3 tablespoons confectioners sugar
4 ounces cream cheese, softened
5 ounces white chocolate baking squares, melted and cooled to room temperature

For the vanilla whipped cream topping:

1 cup whipping cream
3 tablespoons confectioners sugar
2 teaspoons vanilla

Method:

To make the crust:

  1. Preheat your oven to 375 degrees.
  2. In a small bowl, whisk together the graham crackers, brown sugar, butter, egg yolk, and vanilla until well-combined. Press the mixture into the bottom of a 9-inch springform pan.
  3. Bake for 8-10 minutes, or until the edges start to turn brown.
  4. Let the crust cool completely while you make the cheesecake layer.

To make the cheesecake:

  1. Lower your oven to 325 degrees.
  2. Beat the cream cheese and butter at medium speed until smooth.
  3. Add in sugar and beat until well-combined.
  4. Add in the sour cream, corn starch, and vanilla; mix on low until smooth.
  5. Pour the mixture on top of the crust, doing your best to spread it evenly.
  6. Bake the cheesecake for one hour. After an hour, it will probably still look jiggly, but don’t worry – this is normal.
  7. Turn off the oven, open the oven door, and let the cheesecake sit in the oven for one hour.
  8. Remove the cheesecake from the oven and let it cool to room temperature, at least one hour.
  9. Place the cheesecake in the fridge to set, at least 4-5 hours or overnight.

To make the mousse (you can do this in advance and keep it in the fridge, or do it right before you’re ready to spread it and just chill it for a few minutes before applying to the cake):

  1. In the bowl of a stand mixer, whip the cream on high until soft peaks form.
  2. Gradually add in your confectioners sugar and beat until stiff peaks form.
  3. Place the whipped cream in the fridge for 5-10 minutes. Meanwhile, combine the melted white chocolate (which, by the way, should be completely cooled before you use it – make sure of this) and cream cheese and beat until smooth and fluffy.
  4. Remove the whipped cream from the fridge, fold it into the white chocolate mixture, and place the mousse back in the fridge for 15-20 minutes.
  5. Once the mousse is nice and cold, use an offset spatula to spread it on top of the cheesecake layer.
  6. Return the cheesecake to the fridge until you’re ready to top it with the whipped cream (which I recommend doing right before you serve it).

To make the whipped cream:

  1. In the bowl of a stand mixer, whip the cream on high until soft peaks form.
  2. Gradually stir in the confectioners sugar and vanilla, and beat until stiff peaks form.
  3. Chill the whipped cream for at least 20-30 minutes (or overnight) before topping off the cheesecake.

Store your leftovers, if any remain, covered in the fridge. The cheesecake will keep for 2-3 days.


Pumpkin Cheesecake

My mom makes the best cheesecake ever. I mean, I’ve had good cheesecake, but hers is just outstanding. In fact, my mom’s cheesecake is so good that rarely do I find myself motivated to make cheesecake myself. The only thing is that my mom is not the biggest fan of pumpkin, which means if I want pumpkin cheesecake, I either need to buy it or make it myself.

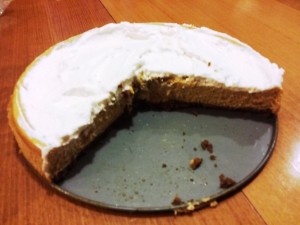
Now some people may find cheesecakes intimidating, but I can assure you that this recipe is really easy to pull off, especially if you own a stand mixer (and even you don’t, that’s okay – a hand mixer will do). I’ve actually made this cake several years but have no idea where the recipe came from (my apologies and thanks to whoever came up with it). If you’re a fan of both cheesecake and pumpkin, I definitely recommend giving this recipe a shot.

pumpkincheesecake

Pumpkin Cheesecake

Ingredients:

For the crust:

1 and 1/4 cups ginger cookie crumbs

1/4 cup butter, melted

For the filling:

Three 8-ounce packages of cream cheese, softened

1 cup granulated sugar

1 tsp cinnamon

1/2 tsp ginger

1/2 tsp nutmeg

2 cups pumpkin puree

4 large eggs

1 cup whipped cream for topping (optional, but recommended)

Method:

  1. Preheat your oven to 350 degrees.
  2. Combine the melted butter and cookie crumbs in a bowl. Once thoroughly combined, press the crumb mixture into the bottom of a 9-inch springform pan. Bake for 10 minutes, then remove from oven and cool for 15-20 minutes on a wire rack. While the crust is cooling, lower the oven temperature to 300 and start working on the filling.
  3. To make the filling, combine the cream cheese, sugar, and spices in a bowl and mix until smooth and fluffy.
  4. Add the pumpkin and mix well.
  5. Add in the eggs one at a time at a low speed, beating until just-combined.
  6. Spread the pumpkin filling evenly over the cooled crust and bake for one hour.
  7. After an hour, turn off the oven and open the door partway. Allow the cheesecake to sit in the opened oven for about 30 minutes, then transfer to a wire rack to cool for another 45-60 minutes.
  8. Cover the cheesecake and transfer it the refrigerator to chill for at least three hours.
  9. Remove the cheesecake from the fridge about 20 minutes or so before you want to serve it. I suggest topping it with whipped cream, but if you’re a purist, you can skip this step. The benefit of having a whipped cream topping is that it helps cover up any cracks that may have formed in your cheesecake. Oh yeah, and it tastes really good.

Brown Velvet Cheesecake Cake

Normally I’m not a big fan of Valentine’s Day. And in all the years my husband and I have been together, I don’t think we’ve ever set foot in a restaurant on V-Day. (What can I say? We’re just not into spending extra money and being forced to order off a pre-fixed menu for no good reason.) But we do have a tradition of enjoying a nice home-cooked meal at the dining room table by candlelight on Valentine’s Day (as opposed to eating on the couch in front of the TV, which we’re definitely guilty of doing more often than we’d like to admit).

This year, I decided to make one of my husband’s favorite pasta dishes and go all out on dessert. My husband can be very picky when it comes to sweets, so I knew that if I wanted to wow him, it was going to have to be something special. Unfortunately, my hectic schedule during the week (you know, kid, job, laundry, the usual) didn’t really afford me the opportunity to spend that extra time slaving over the stove. So we decided to postpone Valentine’s Day until the weekend, which gave me the time I needed to prepare everything the way I wanted.

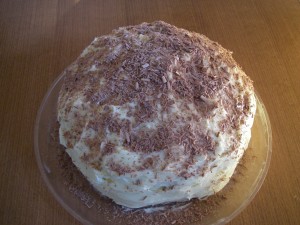
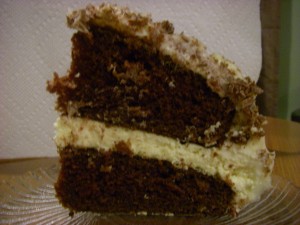
So about that dessert: I decided to make a brown velvet cheesecake cake. It’s basically your classic red velvet cake sans food coloring with a cheesecake layer in between, covered in cream cheese frosting. I figured it was appropriate for Valentine’s Day, but most importantly, that my husband would really enjoy it.

Why did I skip the red? For some people, that rich red color is what makes the cake special. For me, the red looks unnatural and is actually kind of a turnoff. So I decided to forego the food coloring and let the cocoa cake actually look like cocoa. And I’m glad I did, because my husband claims that the cake tasted better specifically because of that. I’m sure he’s just saying that to be nice, but I’ll take it.

IMGP1687

Brown Velvet Cheesecake Cake
From RecipeGirl

Ingredients:

For the cheesecake:
Two 8-ounce packages cream cheese, at room temperature
2/3 cup granulated sugar
pinch of salt
2 large eggs
1/3 cup sour cream
1/3 cup heavy whipping cream
1 teaspoon vanilla extract

For the brown velvet cake:
2 1/2 cups AP flour
1 and 1/2 cups granulated white sugar
3 tablespoons unsweetened cocoa powder
1 and 1/2 teaspoons baking soda
1 teaspoon salt
2 large eggs, at room temperature
1 and 1/2 cups vegetable or canola oil
1 cup buttermilk
2 teaspoons vanilla extract
2 teaspoons white vinegar

For the cream cheese frosting:
2 and 1/2 cups powdered sugar
Two 8-ounce packages cream cheese, at room temperature
1/2 cup unsalted butter, at room temperature
1 tablespoon vanilla extract

For topping:
A bar of chunk of chocolate to make shavings or curls, optional

Method:

For the cheesecake layer:
1. Preheat your oven to 325 degrees and boil a kettle of water. You’ll need this for a water bath.
2. Spray a 9-inch springform pan with nonstick spray and line the bottom with parchment paper. Wrap a double layer of foil around the bottom and up the sides of the pan, sealing it tightly so that water can’t get in.
3. In a large bowl, use an electric mixer to mix the cream cheese until it’s nice and smooth.
4. Add in sugar and salt and mix for about two minutes, scraping down the sides of the bowl as needed.
5. Add your eggs, one at a time, blending after each addition.
6. Mix in sour cream, whipping cream, and vanilla. Beat until smooth.
7. Pour the batter into the prepared pan. Set the pan into a larger pan (I used a roasting pan) in the pre-heated oven. Pour the hot water from your kettle into the roasting pan so that there’s about an inch of water coming up the foil along the sides of the cheesecake pan.
8. Bake the cheesecake for 45 minutes until it’s set to the touch and doesn’t jiggle.
9. Remove the cheesecake from the roasting pan and let it cool on a wire rack for at least an hour. Once cooled, place the pan into the freezer and let the cheesecake freeze completely. This can be done in several hours. (I made my cheesecake the day before I made the cake and left it in the fridge overnight. I then stuck it in the freezer for about an hour the next morning.)

For the cake layers:
1. Preheat your oven to 350 degrees . Grease and flour two 9-inch baking pans.
2. In a large bowl, whisk together the flour, sugar, cocoa powder, baking soda and salt.
3. Add eggs, oil, buttermilk, food coloring, vanilla and vinegar to the flour mixture. Using an electric mixer on medium-low speed, beat until blended (about one minute). Scrape down the sides and bottom of the bowl with a rubber spatula and then beat the mixture on high for two minutes.
4. Spread the batter evenly into the prepared pans and bake for 30 to 35 minutes, or until an inserted toothpick comes out clean.
5. Cool the cakes in their pans on a wire rack for 10 minutes; then run a knife around the edge of the pans and invert the cakes onto a rack to cool completely.

For the frosting:
1. In a large bowl, using an electric mixer on medium-high speed, beat powdered sugar, cream cheese, butter and vanilla until it is smooth and creamy.

To assemble the cake:
2. Place one cake layer into the center of a cake plate or platter.
3. Remove the cheesecake from the freezer, take off the sides of the pan, and slide a knife under the parchment to remove the cheesecake from the pan. Peel off the parchment.
4. Measure your cheesecake layer against the cake layers. If the cheesecake layer is larger, which it may be, place it on a cutting board and gently shave off some of the exterior to get it to be the same size as your cake layers. (Have a small dish on hand to collect the excess cheesecake—it makes a nice interim snack, trust me.)
5. Place the cheesecake layer on top of the first cake layer. Then place the second cake layer on top of the cheesecake.
6. Apply a layer of frosting to the top and sides of the cake, and then place the cake in the fridge for 30 minutes for the frosting to set.
7. After 30 minutes, remove the cake from the fridge and apply a second layer of frosting. Top with chocolate shavings or curls if desired (I topped my cake with milk chocolate; white chocolate also works well).
8. Store the cake in the fridge until you’re ready to serve it.

IMGP1691