Nutella Brownies

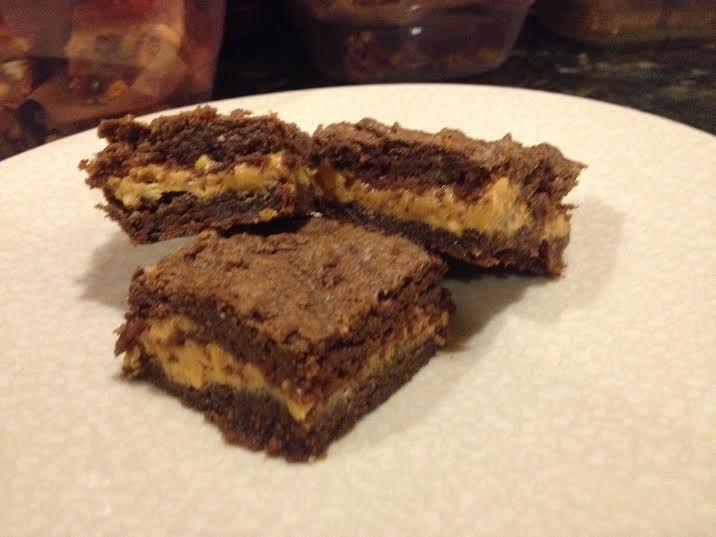
I’m not a particularly big Nutella fan on its own. Some people can just sit there and eat that stuff by the spoonful, but I’m not one of them. On the other hand, I often find that when you take Nutella and add into the right recipe, it can work wonders on the flavor front. Case in point: these Nutella brownies. What you’ve got here is the rich, chocolate goodness of a classic fudge brownie enhanced by the addition of Nutella. To balance out the sweetness a little, I used bittersweet chocolate chunks in my recipe, but if you’re not afraid of really sweet things, feel free to substitute with semisweet or milk chocolate chips.
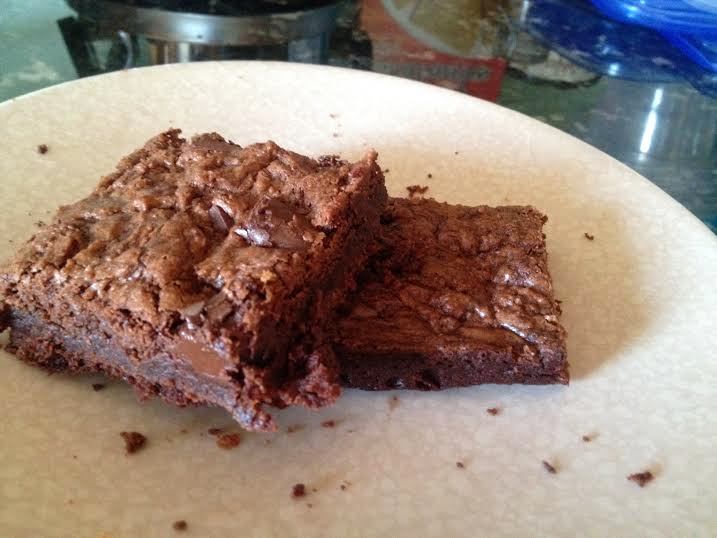
Nutellabrown

Nutella Brownies

Ingredients:
1 stick of butter, melted
1/2 cup granulated sugar
1/2 cup dark brown sugar
1 large egg
1 tsp vanilla
1 cup AP flour
1/4 tsp salt
1/2 cup cocoa powder
1 cup Nutella
1 cup bittersweet chocolate chunks

Method:

  1. Preheat your oven to 350 degrees. Grease an 8×8 baking pan and set aside.
  2. In a large bowl, whisk together the butter, sugars, egg, and vanilla. Set aside.
  3. In a small bowl, combine the flour, salt, and cocoa powder.
  4. Mix the dry ingredients into the wet until well-combined; then stir in the Nutella and chocolate chunks.
  5. Pour the batter into your prepared pan. Bake for 28-32 minutes, or until an inserted toothpick comes out clean. Let the brownies cool in the pan for at least an hour before slicing and serving.

Coconut Almond Joy Blondies

I’ve said it before, and I’ll say it again: I just love the simplicity of blondies. They come together so quickly and without all the hassle involved in digging out your fancy kitchen tools. And they’re so versatile – you can take a blondie recipe you’ve used before and transform it just by altering a few of the ingredients. That’s what I did with my latest batch anyway.

These blondies are very similar to the coconut M&M blondies I made back in November, only the addition of Almond Joy Pieces really amps up that coconut flavor. I love the chewy texture you get from the coconut, and the Almond Joy pieces just make these bars look fun and festive. Coconut fans, stop what you’re doing and go make yourselves some blondies. You can thank me later.

almjoyjpg

Coconut Almond Joy Blondies

Recipe from RecipeGirl

Ingredients:

10 tablespoons unsalted butter, melted and cooled to room temp
1 cup packed dark brown sugar
1/4 cup granulated white sugar
1 large egg
2 teaspoons vanilla extract
1/4 teaspoon kosher salt
1 1/4 cups all-purpose flour
1 1/4 cups sweetened flaked coconut
1 cup Almond Joy Pieces
1/2 cup semisweet chocolate chips

Method:

  1. Preheat your oven to 350 degrees. Spray an 8×8-inch pan with nonstick spray and then line the bottom with parchment paper.
  2. In a large mixing bowl, combine the butter and sugars.
  3. Stir in the egg, vanilla, and salt.
  4. Stir in flour, coconut, Almond Joy Pieces, and chocolate chips until well-combined.
  5. Pour the batter into the prepared pan and smooth the top with a rubber spatula.
  6. Bake for 25 to 30 minutes, or until an inserted toothpick comes out clean.
  7. Let the blondies cool completely in the pan before turning them out onto a cutting board and cutting into squares.

Peanut Butter Blondies With Reese’s Pieces

Sometimes you have days where you’ve just got to have peanut butter. There’s no question about it. Yesterday was one of those days. After being cooped up during yet another snowstorm, I needed some peanut butter in my life, pronto. Enter these blondies. They’re only slightly different from the ones I made a few months back, but I like the playful color the Reese’s Pieces bring to the mix. Also, the candy coating from the Reese’s adds some crunch to an otherwise soft, chewy, and delicious blondie bar. If you’re craving peanut butter and stuck indoors, be kind to yourself and make a batch of these.

Reesesjpg

Peanut Butter Blondies With Reese’s Pieces

Ingredients:

1/4 cup (1/2 stick) butter, melted and cooled to room temp
1/4 cup peanut butter (smooth or chunky)
1/2 cup light brown sugar
1/2 cup granulated sugar
1 egg
1 tsp vanilla
1 cup AP flour
1/2 tsp salt
1 and 1/2 cups Reese’s Pieces

Method:

  1. Preheat your oven to 350 degrees. Grease an 8×8 baking pan and set aside.
  2. In a medium bowl, whisk together the melted butter, peanut butter, and sugars until well-combined.
  3. Beat in the egg (you can use a whisk or a fork for this) and vanilla; mix until well-incorporated.
  4. Stir in the flour and salt, mixing well.
  5. Stir in the Reese’s Pieces.
  6. Pour your batter into the prepared pan and bake for 22-25 minutes, or until an inserted toothpick comes out clean.
  7. Let the blondies cool in the pan (at least one hour) before slicing and serving.

Everything Blondies

I’ve been kind of bad about posting stuff lately – we can thank my new work schedule for that. But believe it or not, I have been doing a fair amount of baking. And eating, of course. In fact, I devoured more of these blondies than I’d like to admit, but they were really just so darn good I couldn’t resist.

One of my favorite things about blondies is the fact that they’re so versatile. So when I found myself having trouble deciding what type of blondies to make for an impromptu get-together, I decided to simply cram a whole bunch of different flavors into a gooey, buttery base. The result? Another fabulous batch of treats.

everythingblond

Everything Blondies

Ingredients:

1/2 cup (1 stick) unsalted butter, melted and cooled to room temp
1 cup light brown sugar
1 large egg
2 tsp vanilla
1 cup AP flour
1/4 tsp salt
2/3 cup butterscotch chips
2/3 cup white chocolate chips
2/3 cup cinnamon chips
2/3 cup semisweet chocolate chips

Method:

  1. Preheat your oven to 350 degrees. Grease an 8×8 baking pan and set aside.
  2. In a medium bowl, whisk together the melted butter, brown sugar, and egg. Stir in the vanilla.
  3. In a separate bowl, combine the flour and salt.
  4. Stir the dry ingredients into the wet until well-combined. Stir in the various chocolate chips, reserving a small amount of each to sprinkle on top if desired.
  5. Bake for 28-32 minutes, or until an inserted toothpick comes out clean. Let the blondies cool in the pan (at least one hour) before slicing and serving.

Chocolate Chunky Peanut Butter Brownies

I just love me a good brownie. And I also happen to be a big fan of the whole chocolate-peanut butter combo. So basically, if you’re me, these brownies are a very good thing. They feature a rich, fudgy chocolate-peanut butter base with a chunky peanut butter filling. Talk about yum.

Incidentally, my work schedule recently changed (read: got more demanding) and so I haven’t been posting (or baking, for that matter) quite as regularly as I normally would. I wonder if this new schedule will have a positive effect on both my wallet and waistline…guess we’ll have to see what happens.

chunkypb

Chocolate Chunky Peanut Butter Brownies

Ingredients:

1 stick of butter, melted
1/2 cup granulated sugar
1/2 cup dark brown sugar
1 large egg
1 tsp vanilla
1 cup AP flour
1/4 tsp salt
1/2 cup cocoa powder
1/2 cup smooth peanut butter
3/4 cup chunky peanut butter

Method:

  1. Preheat your oven to 350 degrees. Grease an 8×8 baking pan and set aside.
  2. In a large bowl, whisk together the butter, sugars, egg, smooth peanut butter, and vanilla. Set aside.
  3. In a small bowl, combine the flour, salt, and cocoa powder.
  4. Mix the dry ingredients into the wet until well-combined.
  5. Pour half of the batter into your prepared pan.
  6. Spread the chunky peanut butter on top of the base layer using either the greased back of a spoon or an offset spatula.
  7. Spread the remaining brownie batter on top.
  8. Bake for 30 minutes, or until an inserted toothpick comes out clean. Let the brownies cool in the pan for at least an hour before slicing and serving.

Avalanche Bark – Er, Balls

Have you tried Avalanche Bark yet? In case you’re not familiar with it, Avalanche Bark is a concoction that comes to us courtesy of the tasty and wonderful Rocky Mountain Chocolate Factory. A year or so ago, I stumbled upon a recipe for it on one of my favorite baking blogs, and I’ve been making my version of it ever since.

The best way to describe this creation is a jacked-up Rice Krispies treat. If you like those, you’re pretty much guaranteed to love Avalanche Bark. And the recipe itself couldn’t be easier. The only problem is that I sometimes have trouble cutting these into nicely formed squares – which is why I decided to improvise when my last batch came apart on me a lot during the portioning process. So half of my Avalanche Bark became Avalanche Balls. And you know what? That really didn’t end up being a problem.

Avbark

Avalanche Bark

Recipe from Brown Eyed Baker

Ingredients:

12 ounces white chocolate, finely chopped
1/2 cup smooth peanut butter
1 and 1/2 cups Rice Krispies
1 and 1/2 cups miniature marshmallows
1/2 cup miniature chocolate chips

Method:

  1. Line an 8×8 baking pan with parchment paper and set aside. Place the miniature chocolate chips on a plate and store in the freezer until ready to use.
  2. Combine the white chocolate and peanut butter in a medium bowl and microwave on 50% power in 30-second increments, stirring after each zap, until completely melted. Remove from microwave, stir in Rice Krispies, and let the mixture cool for about 15-20 minutes.
  3. Stir in the miniature marshmallows followed by the miniature chocolate chips.
  4. Pour the mixture into your prepared pan and press into an even layer. Refrigerate for 30 minutes, or until set.
  5. Use a very sharp knife to cut into squares. If your mixture comes apart on you, don’t worry – just use your fingers to form it into balls and stick your new creations back into the fridge to reset that way.
  6. Store your Avalanche Bark in the fridge in an airtight container. It’ll keep for several days if you don’t devour it first.

avballs


And here’s the bite-sized ball version. Part of me almost likes these better. Maybe I’ll make them this way on purpose the next time around.

White Chocolate Pistachio Cranberry Bark

So yeah, clearly I’ve been making (and, ahem, eating) a lot of holiday candy lately. The latest offering I have to share with you is this delicious white chocolate bark studded with dried cranberries and pistachios. I’ve seen and tried the white chocolate-cranberry-pistachio combo in everything from candy to cookies to blondies to cake, and it seems to work magically every time. And as is the case with many of my bark recipes, this one is incredibly easy to pull off. If you’re looking for a yummy holiday snack to bring to a party, this one is sure to enhance the festivities.

craisinpistachio

White Chocolate Pistachio Cranberry Bark

Ingredients:

2 cups white chocolate morsels or melting discs
3/4 cup chopped pistachios, plus 1/4 cup for topping
3/4 cup dried cranberries, plus 1/4 cup for topping

Method:

  1. Line a baking sheet with parchment paper and set aside.
  2. Melt the white chocolate using either a double boiler or the microwave at 50% power for 30-second increments. Pay attention to your chocolate and remove it from the heat once it’s mostly melted (if needed, use a spoon to stir any remaining lumps until they’re totally melted and well-integrated).
  3. Once your chocolate is melted, quickly stir in 3/4 cup pistachios and 3/4 cup dried cranberries.
  4. Pour the chocolate mixture onto the prepared baking sheet, using the back of a spoon or a spatula to spread it evenly.
  5. Sprinkle the remaining 1/4 cup pistachios and 1/4 cup dried cranberries on top.
  6. Place the baking sheet in the fridge and leave for at least one hour to set before breaking into pieces.

Caramel Coconut Cashew Bark

Can you tell how much I just love candy? The latest installment in my holiday baking rotation is this awesome caramel coconut cashew bark. Imagine rich dark chocolate stuffed and topped with slightly salty cashews, gooey caramel, and heavenly toasted coconut. I mean, really, does it get much better?

coccashew

Caramel Coconut Cashew Bark

Ingredients:

2 cups dark chocolate morsels or melting discs
3/4 cup chopped cashews
2/3 cup caramel sauce (you can make your own by combining about 12 Kraft caramel candies with a tablespoon of milk or cream), divided in half
1 cup toasted coconut

Method:

  1. Line a baking sheet with parchment paper and set aside.
  2. Melt the dark chocolate using either a double boiler or the microwave at 50% power for 30-second increments. Pay attention to your chocolate and remove it from the heat once it’s mostly melted. If you leave it too long, your chocolate could seize on you.
  3. Once melted, quickly stir in the chopped cashews and 1/3 cup caramel sauce.
  4. Pour the chocolate mixture onto the prepared baking sheet, using the back of a spoon or a spatula to spread it evenly.
  5. Use the back of a spoon or a knife to swirl the remaining 1/3 cup caramel sauce on top of the chocolate layer.
  6. Quickly sprinkle the toasted coconut on top, using your hands as needed to press it into the mixture.
  7. Place the baking sheet in the fridge and leave it for at least one hour to set before breaking into pieces.

Chocolate Macadamia Toffee Bark

As I mentioned earlier this week, I’ve been deep into candy-making mode. The great thing about making your own holiday bark is that you can feel free to get as creative as you’d like with the flavors and textures you most enjoy. Along these lines, I present my chocolate macadamia toffee bark: an easy recipe to follow, and a delicious one to snack on once it’s done.

Chocolate Macadamia Toffee Bark

mactoffeebarj

Ingredients:

2 cups milk chocolate morsels or melting discs
1 cup chopped macadamia nuts
2/3 cup toffee bits, plus another 1/3 cup for topping
3/4 cup white chocolate morsels or baking discs

Method:

  1. Line a baking sheet with parchment paper and set aside.
  2. Melt the milk chocolate using either a double boiler or the microwave at 50% power for 30-second increments. Pay attention to your chocolate and remove it from the heat once it’s mostly melted. If you leave it too long, your chocolate might seize.
  3. Once melted, quickly stir in the chopped macadamia nuts and 2/3 cup toffee bits.
  4. Pour the chocolate mixture onto the prepared baking sheet, using the back of a spoon or a spatula to spread it evenly.
  5. Melt the white chocolate using the methods described above.
  6. Once melted, use the back of a spoon or a knife to swirl it around on top of the milk chocolate layer.
  7. Sprinkle remaining 1/3 cup toffee bits on top of the newly poured white chocolate, using your fingers to press in the bits as needed to get them to stick.
  8. Place the baking sheet in the fridge and leave for at least one hour to set before breaking into pieces.

Holiday Chocolate Chip Sugar Cookies

More often than not, I tend to forego traditional cookies in favor of cookie bars. I just find that they’re quicker and easier to make, store, and transport. But as yummy as my bars tend to be, there’s just something about that classic cookie shape that screams “holiday season” to me. So in the spirit of wanting to spread some joy around the office this week, I brought in a batch of sugar cookies with chocolate chips.

As far as cookie recipes go, this one couldn’t be simpler. It’s your basic sugar cookie flavored with vanilla and studded with festive holiday chocolate chips (if you can’t find the red and green chips in the supermarket, you could always use regular chips or red and green M&Ms instead). Also, chilling the dough in the fridge is optional, but recommended. I know some people don’t like having to chill dough because it makes the process take longer, but I found that a quick 10-minute chill was all it took to get this last batch just right.

holsugcookies

Holiday Chocolate Chip Sugar Cookies

Ingredients:

1 and 1/2 cups AP flour
1/2 tsp baking soda
1/4 tsp baking powder
1/8 tsp salt
1/2 cup butter
3/4 cup granulated sugar
1 egg
1 tsp vanilla
1 and 1/2 cups chocolate chips

Method:

  1. Preheat your oven to 375 degrees.
  2. In a medium bowl, cream together the butter and sugar until light and fluffy. Beat in the egg, and then stir in the vanilla.
  3. In a separate bowl, whisk together the four, baking soda, baking powder, and salt. Gently stir the dry ingredients into the wet until well-combined. Then, stir in chocolate chips.
  4. Refrigerate dough for 10-15 minutes. In the meantime, prepare several baking sheets.
  5. Remove the dough from the fridge and use your hands to form small rounded discs. Be sure to leave enough space for the cookies to spread.
  6. Bake for 10-12 minutes, until the edges begin to turn golden. Let the cookies cool on their sheets for a minute or two before transferring to wire racks to cool completely.

Note: This recipe makes about 2 and 1/2 dozen cookies but can pretty easily be doubled if you’re feeding a larger crowd. These cookies will keep for a good 4-5 days if stored at room temperature in an airtight container.