Mom’s Jam Cake

I love family recipes that are so simple but also so good. Case in point: my mom’s jam cake.

My mom has been making this cake for as long as I can remember. The great thing about it is that it’s super versatile – you can serve this cake as an afternoon cake or have it for breakfast, and it’ll fit right in. It’s sweet, but not very sweet – in fact, most of the sweetness comes from the filling more so than the actual dough – and it lends itself to a world of variation. It’s also a great cake to serve if you need a non-dairy option. While I tend to be a bit of a butter snob and only substitute margarine when absolutely necessary, in this cake the margarine totally works. And if you stick any leftovers you have of this cake in an airtight container, it’ll keep for a solid week, if not a touch longer.

Thanks, Mom, for making this cake so many times over the years – ’cause as easy as it is to make, there’s just something to be said about home-baked goods that are actually prepared by somebody else.

jamcakes

Jam Cake

Ingredients:

2 sticks butter or margarine
3/4 cup granulated sugar
1 large egg
1/2 tsp vanilla
2 and 1/2 cups AP flour
2 and 1/2 tsp baking powder
pinch of salt
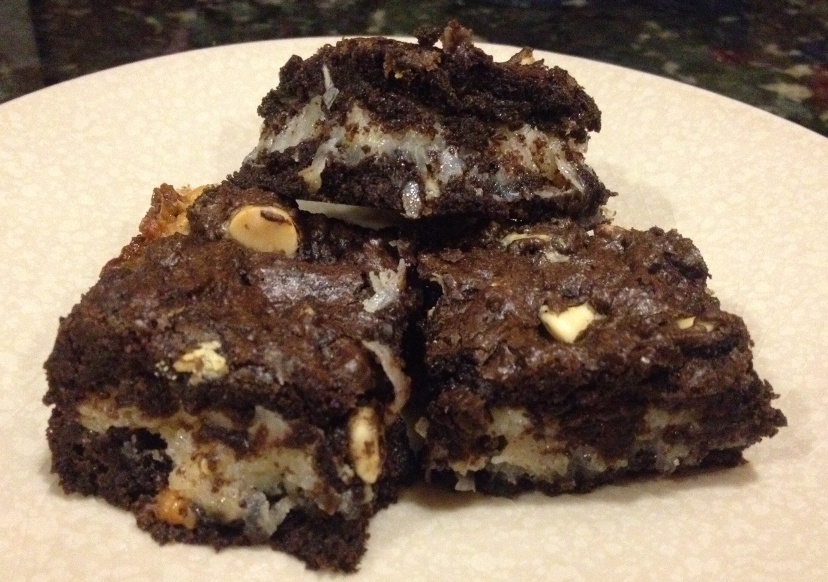
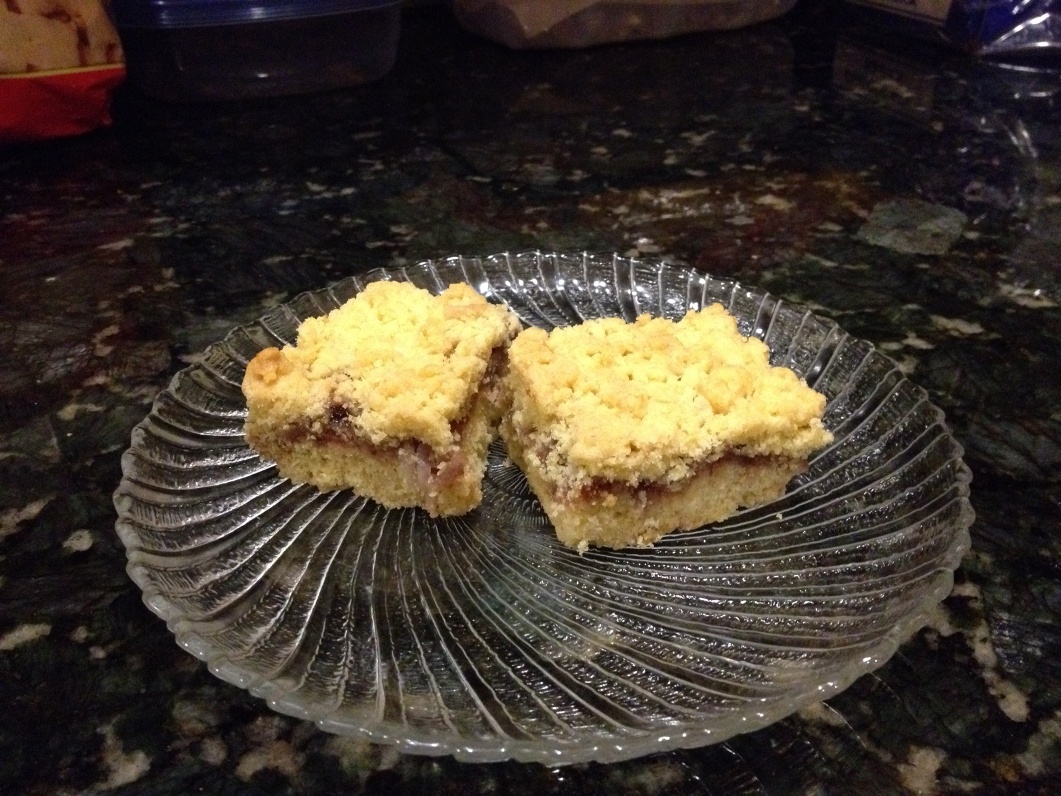
1 cup filling of your choice – two of my favorites are prune jam (the same kind I used to make my hamentashen earlier this year) and 1 cup strawberry jam mixed with 1 cup sweetened coconut – but really, feel free to get creative)
Confectioners sugar for dusting, optional

Method:

  1. Preheat your oven to 350 degrees. Lightly grease and flour a 9×13 baking pan, and set aside.
  2. In a large bowl, cream the butter/margarine and sugar until light and fluffy. Beat or whisk in the egg and vanilla.
  3. In a separate bowl, whisk together the flour, baking powder, and salt. Pour the dry ingredients into the wet and mix until well-combined.
  4. Pour half of the batter into your prepared pan.
  5. Using a spoon or offset spatula, spread your filling of choice evenly on top.
  6. Use either a grater or your fingers to crumble the remaining dough over the top of the cake. (I prefer to use my hands. To prevent the dough from sticking to my fingers, what I like to do is coat one hand with a little cooking spray and use that hand to do the actual crumbling while leaving the other hand free to keep applying the spray. I suppose there are less complicated ways to do it, but this one works for me.)
  7. Bake the cake for 40-50 minutes, or until the top starts to turn golden without getting too dark.
  8. Once the cake has cooled completely, you can dust it with confectioners sugar.

jamslice2

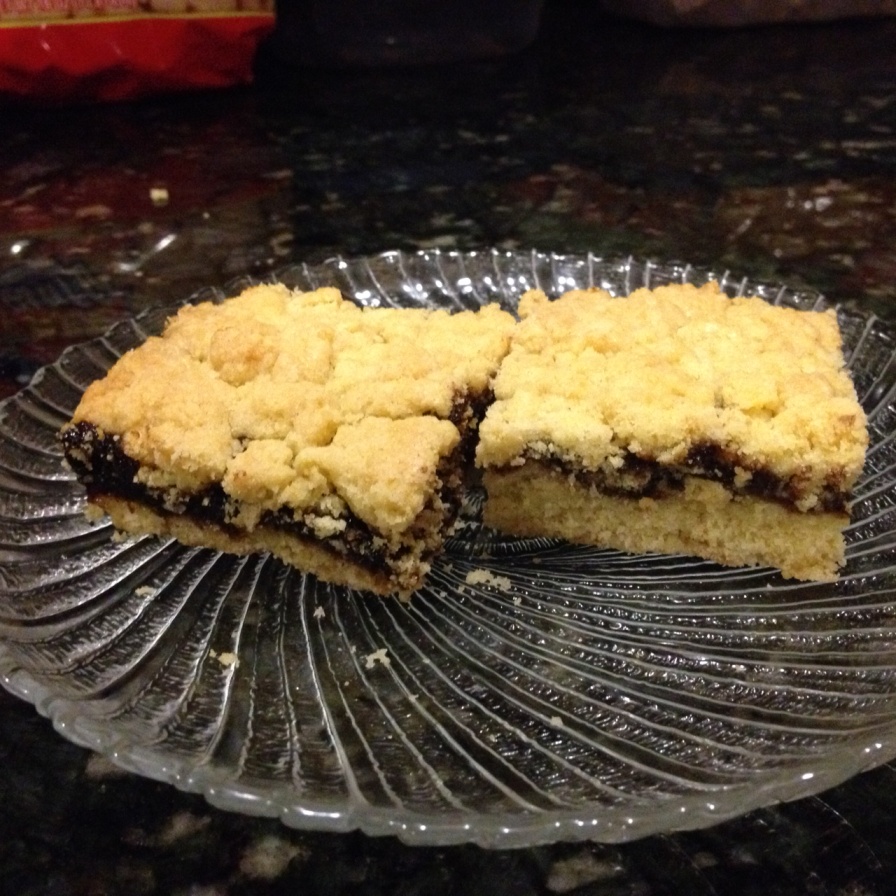
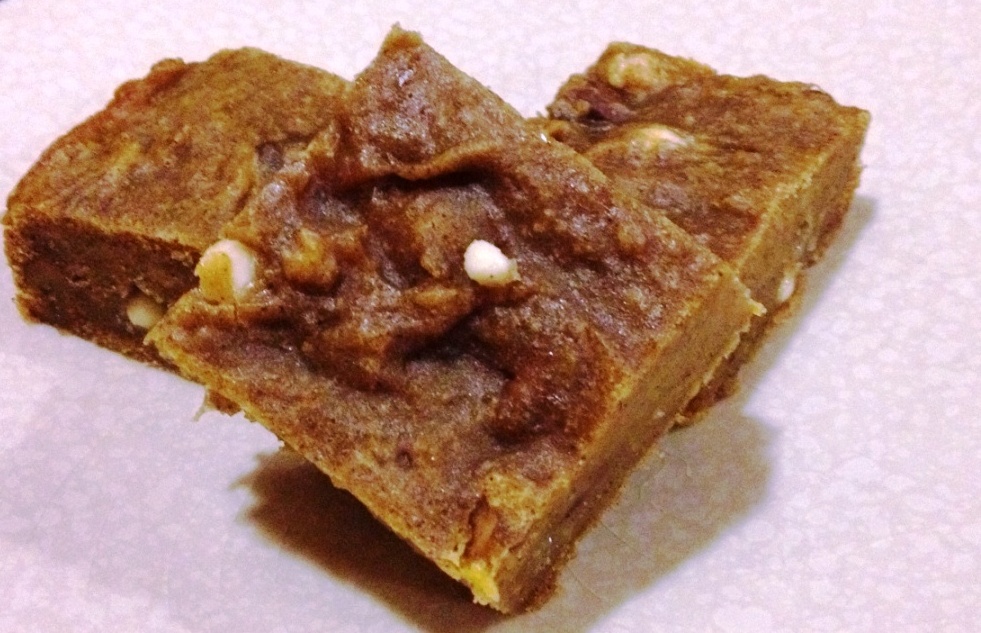
Check out the yummy prune version above.

jamslice

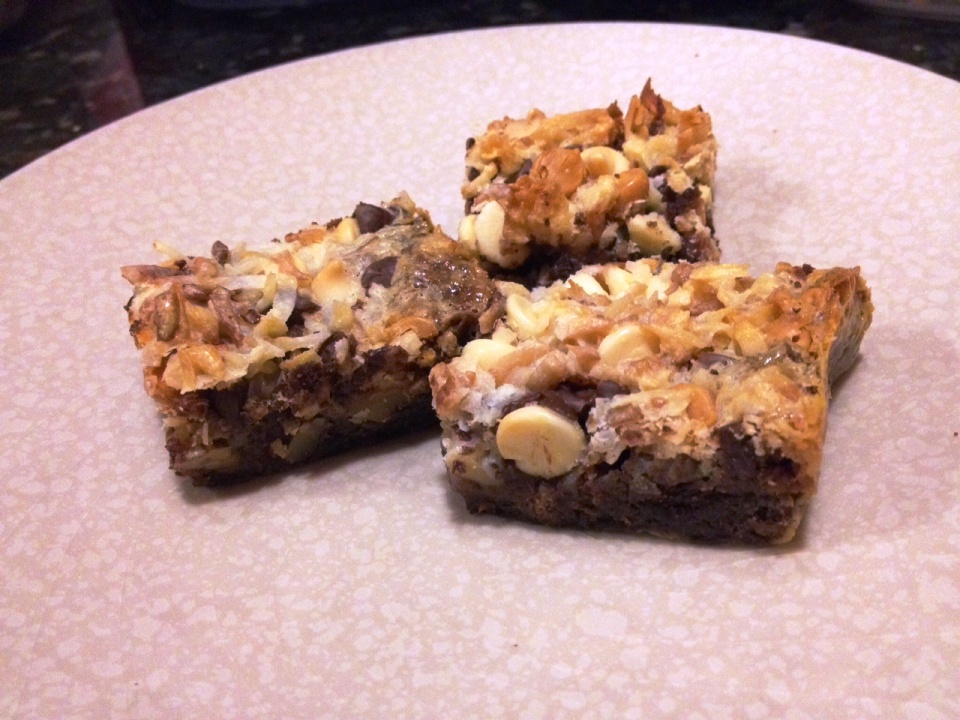
And the strawberry coconut counterpart…

Pecan Pumpkin Bars

At some point I do realize this pumpkin fixation is going to have to start. After all, the holidays are almost here, at which point I may have to shift my attention toward my beloved peppermint bark. But until then, I will continue to be all about the pumpkin.

These pumpkin bars are super moist and very dense. One of the things I like about them is that they’re not super sweet – you can eat them for breakfast and not feel like you’re starting your day off with junk food. At the same time, if you prefer a sweeter bar, it’s easy enough to kick up the sugar factor by adding more white chocolate chips, and well, more sugar. Best of all, these bars are super easy to prepare, so if you’re short on time, as I tend to be, they’re a good snack to quickly throw together.

pecpumpbars

Pecan Pumpkin Bars

Ingredients:

1 and 1/4 cups AP flour
1 and 1/2 tsp cinnamon
1/2 tsp nutmeg
1/2 tsp ginger
1/4 tsp salt
1/2 cup butter, melted and cooled to room temp
1/2 cup dark brown sugar
1/4 cup granulated sugar
1 egg
1 and 1/2 tsp vanilla
1 cup pumpkin puree
1 cup toasted pecans, chopped
1/3 cup white chocolate chips

Method:

  1. Preheat your oven to 350 degrees. Grease an 8×8 baking pan and set aside.
  2. In a small bowl, whisk together the flour, spices, and salt. Set aside.
  3. In a large bowl, whisk together the melted butter and sugars until well-combined. Beat in the egg.
  4. Whisk in the vanilla and pumpkin until well-incorporated.
  5. Stir in the flour mixture until well-combined. Then, stir in the pecans and white chocolate chips, reserving a few to sprinkle on top if desired.
  6. Pour the batter into your prepared pan and bake for about 35 minutes, or until an inserted toothpick comes out clean.
  7. Let the bars cool in the pan for at least 2 hours before slicing and serving.

Pumpkin Oatmeal Cookies

Yes, I’m still doing the pumpkin thing. No, I haven’t gotten tired of it yet, as evidenced by these moist, cakey pumpkin oatmeal cookies. Feel free to get creative with the mix-ins, though I personally think white chocolate chips and dried cranberries were the perfect choice for this easy recipe.

pumpkinoatmealcookies

Pumpkin Oatmeal Cookies

Recipe from My Baking Addiction

Ingredients:

2 cups AP flour
1 1/2 cups oldfashioned oats
1 teaspoon baking soda
1 1/2 teaspoon ground cinnamon
1/2 tsp nutmeg
1/2 tsp ginger
1/2 teaspoon kosher salt
1 cup (2 sticks) butter, softened
1 cup packed light brown sugar
1 cup granulated sugar
1 cup pure pumpkin puree
1 large egg
1 teaspoon vanilla
1 cup white chocolate chips
1 cup dried cranberries

Method:

  1. Preheat your oven to 350 degrees. Line 2-3 baking sheets with parchment paper and set aside.
  2. Combine the flour, oats, baking soda, spices, and salt in medium bowl. Beat the butter and sugars in a large bowl until light and fluffy.
  3. Add in the pumpkin, egg, and vanilla, mixing well to combine.
  4. Add the flour mixture; mix until well-incorporated.
  5. Fold in white chocolate chips and dried cranberries.
  6. Drop the batter by rounded tablespoons onto your prepared baking sheets. Bake for 12-14 minutes, or until the cookies are lightly browned. Cool on baking sheets for 2 minutes, then transfer to wire racks to cool completely. When stored in an airtight container, these cookies should last a good 4-5 days (if you don’t polish them all off before then).

Brownies With Pumpkin Caramel Sauce and White Chocolate Chips

Looking for a pumpkin-infused twist on a simple, classic brownie? Try this recipe. It’s quick, easy, and very, very tasty. Plus, you can use any leftover pumpkin-caramel sauce as a topping for your next ice cream sundae. (Or, you know, just eat the remains with a spoon…)

browniespumpkincaramel

Brownies With Pumpkin Caramel Sauce and White Chocolate Chips

Ingredients:

1 stick of butter, melted
1/2 cup granulated sugar
1/2 cup dark brown sugar
1 large egg
1 tsp vanilla
1 cup AP flour
1/4 tsp salt
1/2 cup cocoa powder
1/2 cup white chocolate chips
1/3 cup pumpkin puree
1/2 cup caramel candies (I used Kraft)
1 tbsp milk

Method:

  1. Preheat your oven to 350 degrees. Grease an 8×8 baking pan and set aside.
  2. In a microwave-safe bowl, melt the caramel candies with the tablespoon of milk at 30-second intervals, stopping to stir in between. Once melted, stir in the pumpkin, and then set aside to cool to room temperature.
  3. In a large bowl, whisk together the butter, sugars, egg, and vanilla. Set aside.
  4. In a small bowl, combine the flour, salt, and cocoa powder.
  5. Mix the dry ingredients into the wet until well-combined.
  6. Stir in chocolate chips.
  7. Pour the brownie batter into your prepared pan and then use a spatula to evenly spread the pumpkin caramel sauce on top.
  8. Bake for 30-35 minutes, or until an inserted toothpick comes out clean. Let the brownies cool in the pan for two hours before slicing and serving.

Pumpkin Oatmeal Crumb Bars

Can you tell that I’m pretty much obsessed with pumpkin?

Over the past few weeks, I’ve made pumpkin bread, pumpkin cookies, pumpkin brownies, pumpkin cheesecake, pumpkin whoopie pies, and pumpkin cake. Incidentally, I’ve also made pumpkin butter, pumpkin soup, pumpkin stew, and a host of other savory items featuring my favorite fall ingredient. But the one thing that was missing from the lineup until recently was the classic pumpkin pie.

Now don’t get me wrong – I like pumpkin pie. Love it, in fact. But this year I kind of wanted to do something different. Enter these pumpkin pie bars, which are essentially pumpkin pie taken up a notch, and in a very good way.

At a recent get-together at my place, I served these bars cold and topped them off with homemade whipped cream, and they were a huge hit. If you’re seriously into pumpkin like I am, go make these bars as soon as you have a chance.

pumpkinpiebars

Pumpkin Oatmeal Crumb Bars

Recipe from Brown Eyed Baker

Ingredients:

For the Oatmeal Crumb:

1 and 1/4 cups all-purpose flour
1 and 1/4 cups quick oats
1/2 teaspoon baking soda
1/2 teaspoon salt
1/2 cup granulated sugar
1/2 cup light brown sugar
3/4 cup unsalted butter, melted and cooled slightly
1 teaspoon vanilla extract

For the Pumpkin Pie Filling:

1/4 cup granulated sugar
1/4 cup light brown sugar
1 teaspoon ground cinnamon
1/2 teaspoon ground nutmeg
1/4 teaspoon ground ginger
1/4 teaspoon salt
1 egg
1 egg yolk
1/2 teaspoon vanilla extract
1 and 1/4 cups canned pumpkin
1/3 cup evaporated milk

Method:

1. Preheat your oven to 350 degrees. Line an 8-inch square baking pan with parchment paper, allowing the excess to hang over the sides.

2. To make the crust, in a medium mixing bowl, whisk together the flour, oats, baking soda, and salt. Add both the granulated sugar and brown sugar and mix until no clumps remain. Add the melted butter and vanilla extract, then stir with a fork until the mixture is evenly moistened. Press half of the mixture into your prepared pan and bake for 15 minutes.

3. To make the filling, whisk together the granulated sugar, brown sugar, cinnamon, nutmeg, ginger, cloves and salt. Add the egg, egg yolk, and vanilla, and whisk until well blended. Whisk in the pumpkin and then the evaporated milk until the mixture is smooth and thoroughly combined.

4. When the crust has finished baking, pour the filling over the bottom crust and return it to the oven for 15 minutes. Remove it from the oven, pinch the remaining oatmeal crumb mixture into small pieces, and sprinkle it over the top of the filling.

5. Return the pan to the oven and bake for an additional 20 to 25 minutes until the top starts to brown and the center jiggles only slightly.

6. Remove the pan from the oven and allow the bars to cool to room temperature for at least 1 to 2 hours. Then, transfer the pan to the refrigerator and chill for at least 2 hours. Store leftovers covered in the fridge – they’ll keep for a few days, assuming they don’t get gobbled up first.

Seven Layer Bars

In my household, the colder the weather, the more frequently baked goods tend to come out of my kitchen. For a recent gathering, I whipped up these seven layer bars in addition to a host of pumpkin treats. In fact, I specifically made these so that the non-pumpkin fans in the group (blasphemy) would have something to snack on.

There are many different recipes out there for seven layer bars, and mine is probably a little different than most of the ones you’ll see.  I’ve actually done the more “classic” seven layer bar in the past and specifically wanted to try something different this time around. I think the chocolate and gingerbread crust gives these bars more of a holiday/wintertime feel. If you really want to make things interesting, you could substitute the butterscotch chips with cinnamon chips. Or, use both and call them eight layer bars.

Although these bars are quite tasty, they’re also really, really sweet. I can only eat a small piece at a time, which is saying a lot. But if you’re looking for a fun, easy recipe to try, go ahead and give this one a shot.

7layerbars

Seven Layer Bars

Ingredients:

1 cup chocolate graham cracker crumbs
1/2 cup gingerbread cookie crumbs
1 stick of butter, melted
1 can (14 ounces) of sweetened condensed milk, divided
1 cup chopped walnuts nuts
1 cup butterscotch chips
1 cup semisweet chocolate chips
1 cup white chocolate chips
1 cup sweetened coconut, toasted

Method:

  1. Preheat your oven to 350 degrees. Line a 9×13 baking pan with parchment paper and set aside.
  2. In a small bowl, combine the melted butter with the chocolate graham cracker and gingerbread cookie crumbs. Press the crumb mixture into the bottom of your prepared pan.
  3. Pour 1/3 cup of condensed milk over the crumb mixture, using a spatula to spread it evenly.
  4. Sprinkle the chopped walnuts on top of the soaked crumb mixture. Then, add the butterscotch, semisweet, and white chocolate chips in layers one at a time.
  5. Spread the toasted coconut on top of the chocolate chips.
  6. Pour the remaining condensed milk over the entire mixture.
  7. Bake for 25-30 minutes, or until the top is slightly browned.
  8. Cool the bars in the pan completely (at least two hours) before slicing and serving.

Coconut-Filled Brownies

There’s just something about warm, fudgy brownies that helps me feel far less bitter when the pretty fall leaves begin to disappear and the weather suddenly turns markedly colder. Since I have a tendency to jazz up my brownies, I decided to take one of my basic recipes and add a chewy coconut layer.

These brownies are rich and super-sweet – so much so that even I, the self-proclaimed world’s biggest sweet tooth, could only eat one at a time. In fact, they kind of tasted like a Mounds candy bar in brownie form. If you’re a fan of coconut and love brownies, give this quick, easy recipe a try.

coconutbrownies

Coconut-Filled Brownies

Ingredients:

1 stick of butter, melted
1/2 cup granulated sugar
1/2 cup brown sugar (I used dark; light will also work)
1 large egg
1 tsp vanilla
1 cup AP flour
1/4 tsp salt
1/2 cup cocoa powder (I used Hershey’s Special Dark)
1/2 cup white chocolate chips (feel free to substitute with semisweet chips or omit)
1 and 1/2 cups sweetened coconut flakes
1/2 cup sweetened condensed milk

Method:

  1. Preheat your oven to 350 degrees. Grease an 8×8 baking pan and set aside.
  2. In a large bowl, whisk together the butter, sugars, egg, and vanilla. Set aside.
  3. In a small bowl, combine the flour, salt, and cocoa powder.
  4. Mix the dry ingredients into the wet until well-combined.
  5. Stir in chocolate chips.
  6. Pour half of the batter into your prepared pan.
  7. In a separate bowl, mix the coconut and condensed milk until thoroughly combined.
  8. Pour the coconut mixture over the brownie layer in the pan, using a spatula to spread it evenly. Then, pour the remaining half of the brownie batter on top of the coconut layer, once again using a spatula as needed to smooth.
  9. Bake for about 35 minutes, or until an inserted toothpick comes out clean. Let the brownies cool in the pan for at least an hour before slicing and serving.


Coconut M&M Blondies

Looking for an easy, kid-friendly treat? Try these blondies. They’re so simple, but so amazingly good. This recipe takes virtually no time to throw together, and you don’t need any fancy tools or anything like that. The hardest part for me was resisting the urge to nibble on M&Ms as I added them to my batter.

coconutmandmblondies

Coconut M&M Blondies

Recipe from RecipeGirl

Ingredients:

10 tablespoons unsalted butter, melted and cooled to room temp
1 cup packed dark brown sugar
1/4 cup granulated white sugar
1 large egg
2 teaspoons vanilla extract
1/4 teaspoon kosher salt
1 1/4 cups all-purpose flour
1 1/4 cups sweetened flaked coconut
1 cup M&Ms
1/2 cup chocolate chips

Method:

  1. Preheat your oven to 350 degrees. Spray an 8×8-inch pan with nonstick spray and then line the bottom with parchment paper.
  2. In a large mixing bowl, combine the butter and sugars.
  3. Stir in the egg, vanilla, and salt.
  4. Stir in flour, coconut, M&Ms, and chocolate chips until well-combined.
  5. Pour the batter into the prepared pan and smooth the top with a rubber spatula. Sprinkle a few additional M&Ms on top if desired.
  6. Bake for 25 to 30 minutes, or until an inserted toothpick comes out clean.
  7. Let the blondies cool completely in the pan before turning them out onto a cutting board and cutting into squares.

Pumpkin Whoopie Pies With Maple Cream Cheese Filling

In case you’ve never been fortunate enough to have a whoopie pie, you should only know how much these things rock. Imagine two moist, cakey discs surrounding a rich layer of creamy filling. Talk about yum.

I’ve been wanting to make classic whoopie pies for some time now but never got around to it, and since I’m currently deep in fall baking mode, I decided that my inaugural whoopie pie attempt would feature none other than pumpkin.

Though I was intimidated at first by the idea of making whoopie pies, especially without a designated whoopie pie pan, I wound up having absolutely no trouble with these. The cake itself came out springy and packed with flavor, and the frosting was the perfect accompaniment.

Now that I’ve dabbled in the world of whoopie pies, I may have to try the classic chocolate version one of these days. Because, you know, that’s what I need around my house – more cake.

pumpkinwhoopies

Pumpkin Whoopie Pies With Maple Cream Cheese Filling

Recipe From Lovin The Oven

Ingredients:

For the cakes:

3 cups all-purpose flour
1 tsp salt
1 tsp baking soda
1 tsp baking powder
2 TBSP cinnamon
1 tsp ground ginger
½ tsp ground fresh nutmeg
1 cup granulated sugar
1 cup dark brown sugar, firmly packed
1 cup canola oil
3 cups chilled pumpkin puree
2 large eggs
1 tsp vanilla extract

For the filling:

3 cups powdered sugar
½ cup unsalted butter, at room temperature
8 ounces cream cheese, at room temperature
3 TBSP maple syrup
1 tsp vanilla

Method:

  1. Preheat your oven to 350 degrees. Prepare 2-3 baking sheets lined with parchment paper.
  2. In a large bowl, whisk together the flour, salt, baking soda, baking powder, and spices. Set aside.
  3. In a separate bowl, whisk together the sugars and oil. Add the pumpkin puree and whisk to combine thoroughly. Add the eggs and vanilla and whisk until combined.
  4. Sprinkle the flour mixture over the pumpkin mixture and whisk until thoroughly combined.
  5. Use a small ice cream scoop with a release mechanism to drop heaping tablespoons of the dough onto the prepared baking sheets, about 1 inch apart.
  6. Bake for 10-12 minutes until the cakes are just starting to crack on top and a toothpick inserted into the center of a cake comes out clean.
  7. Remove from the oven and let the cakes cool completely on the pan while you make the filling.
  8. To make the filling, beat the butter until smooth with no visible lumps. Add the cream cheese an beat until combined.
  9. Add the powdered sugar, maple syrup, and vanilla, and beat until smooth.
  10. To assemble the whoopie pies, turn half of the cooled cakes upside down. Pipe filling onto each half, then place another cake, flat side down, on top of the filling. Press down slightly so that the filling spreads to the edges of the cake. Repeat until all cakes are used.
  11. Place the whoopie pies in the refrigerator for about 30 minutes to firm up. If you’re serving them right away, you can remove them once they’re firm and keep them stored at room temperature; otherwise leave them in the fridge, where they’ll keep for a couple of days.


Pumpkin Cheesecake

My mom makes the best cheesecake ever. I mean, I’ve had good cheesecake, but hers is just outstanding. In fact, my mom’s cheesecake is so good that rarely do I find myself motivated to make cheesecake myself. The only thing is that my mom is not the biggest fan of pumpkin, which means if I want pumpkin cheesecake, I either need to buy it or make it myself.

Now some people may find cheesecakes intimidating, but I can assure you that this recipe is really easy to pull off, especially if you own a stand mixer (and even you don’t, that’s okay – a hand mixer will do). I’ve actually made this cake several years but have no idea where the recipe came from (my apologies and thanks to whoever came up with it). If you’re a fan of both cheesecake and pumpkin, I definitely recommend giving this recipe a shot.

pumpkincheesecake

Pumpkin Cheesecake

Ingredients:

For the crust:

1 and 1/4 cups ginger cookie crumbs

1/4 cup butter, melted

For the filling:

Three 8-ounce packages of cream cheese, softened

1 cup granulated sugar

1 tsp cinnamon

1/2 tsp ginger

1/2 tsp nutmeg

2 cups pumpkin puree

4 large eggs

1 cup whipped cream for topping (optional, but recommended)

Method:

  1. Preheat your oven to 350 degrees.
  2. Combine the melted butter and cookie crumbs in a bowl. Once thoroughly combined, press the crumb mixture into the bottom of a 9-inch springform pan. Bake for 10 minutes, then remove from oven and cool for 15-20 minutes on a wire rack. While the crust is cooling, lower the oven temperature to 300 and start working on the filling.
  3. To make the filling, combine the cream cheese, sugar, and spices in a bowl and mix until smooth and fluffy.
  4. Add the pumpkin and mix well.
  5. Add in the eggs one at a time at a low speed, beating until just-combined.
  6. Spread the pumpkin filling evenly over the cooled crust and bake for one hour.
  7. After an hour, turn off the oven and open the door partway. Allow the cheesecake to sit in the opened oven for about 30 minutes, then transfer to a wire rack to cool for another 45-60 minutes.
  8. Cover the cheesecake and transfer it the refrigerator to chill for at least three hours.
  9. Remove the cheesecake from the fridge about 20 minutes or so before you want to serve it. I suggest topping it with whipped cream, but if you’re a purist, you can skip this step. The benefit of having a whipped cream topping is that it helps cover up any cracks that may have formed in your cheesecake. Oh yeah, and it tastes really good.